Mache Forest Maiden Mask
Paper Mache Forest Maiden Mask
In the past, I’ve often made small paper mache items, but some of my favorite pieces I’ve had the most fun with are the small masks. I’ve always wanted to try making a larger version paper mache mask. I thought about the many different style masks I’ve seen in the past. I had fun drawing several rough sketches and finally decided to try making a mask that looked like a forest maiden with leaves for hair.
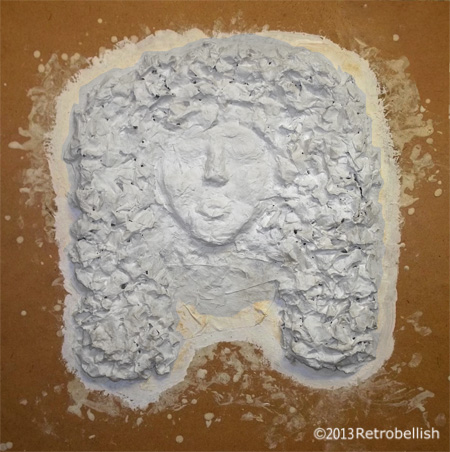
I found a large piece of Masonite board in the garage that I thought was the perfect size base for my mask. I dusted off the board and wiped it clean. I then gathered a stack of old newspapers and started tearing up sheets into medium size pieces (about 2 to 4 inch pieces). I continued until I had a large pile of torn up newspaper pieces. I then made the paper mache paste using flour and water – with a dash of salt as a preservative.
I took some of the larger newspaper pieces and started soaking them into the paste mixture. I then started the mask with the face by placing some of the bigger soaked chunks down on the board. Once I started forming the face, I started to place smaller soaked pieces on top of the base pieces by laying them on as smoothly as possible.
Once I had something resembling a pleasing shape of a face, I worked on building up the forehead, the eyebrow areas and then the cheek bones. I rolled and soaked several torn pieces together and placed those large soaked pieces in the area where the nose would go and then did the same with the mouth. I decided to make her mouth open as if she was whispering to nature. While the face was drying, I worked on the hair, which I tried as closely as possible to resemble leaves. I had to let the basic parts of the mask dry before adding on additional layers over certain parts of the face and hair. It is an abstract piece and once I felt it was done, I was very pleased with the entire piece because I was able to make it look closely to what I had imagined.
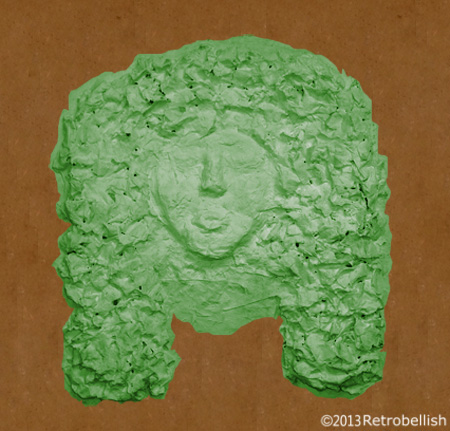
I had started this mask project on a weekend and after the base layers dried for several days, I waited until the next weekend to add the final layers that needed to be built up. Once, I knew the mask was completely dry, I painted a coat of gesso on the entire piece. I let the gesso coat dry overnight. I then painted a base green color over the entire piece on which I will add to at a later date. I really enjoyed making this mask, and although I used old newspapers, you can always use magazines or scrap paper of any kind to make this project.