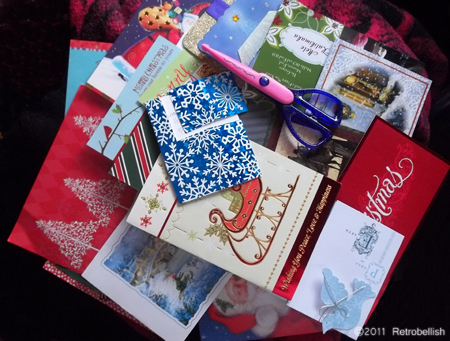
Re-purpose Your Holiday Cards
This is a previous post.
Embellished Teal Blue Knit Blouse

This project started out from one of my thrift store finds. I had come across this teal blue blouse that I really liked, but the only thing wrong was that the stripes around the collar and sleeves were faded, which made the blouse look worn out. Looking at the blouse more closely, I knew that I could create a decorative piping to cover the faded black stripes. To achieve this, I used a size I crochet needle and size 3 black fashion crochet yarn (100% Mercerized Cotton).
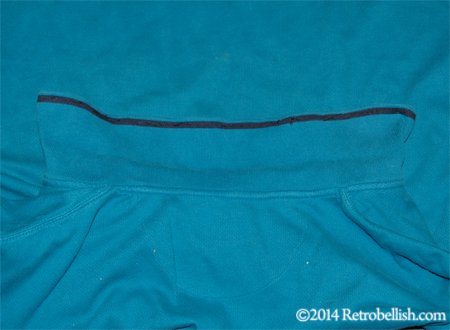
I made the crocheted piping (using single stitches) to cover the black faded stripe around the collar and more piping to cover the faded stripes around each of the sleeves. The blouse actually looked better than I thought and I had plenty of black crochet yarn, so I decided to also pipe around the V neckline of the blouse. It gave the blouse an all new look and the best part of it was that it was so fast and easy to do.
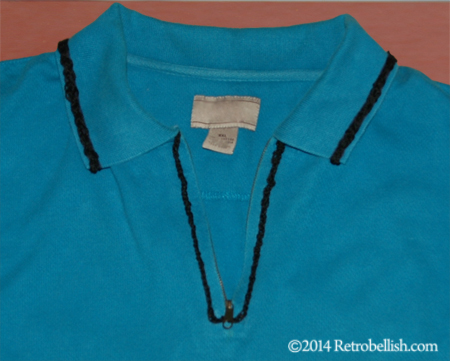
So just pick any item you may want to embellish and just by adding a little bit of piping you can embellish an old shirt back to life. So just have fun and create your own.
Retrobellish Fashion Accessories
These are some of our previous reclaimed fabric projects about fashion accessories. Click on the pictures to read the whole articles. Reclaimed Fabric Red & Black Choker
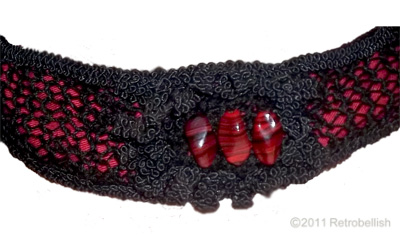
The choker was made from a leftover red fabric strip of soft thick cotton and a stretchy black netting that I knitted. I knitted the two pieces (using size 8 knitting needles and size 3 crochet thread–12 stitches wide by 36 rows). Next I hand sewed the edges of the finished knitted piece at the edges stretching it as I sewed it across the face of the red fabric to make the stitches wider and show off more of the red fabric. I then sewed on a trim all the way across on both edges.
Wearing Finished Beaded Fabric Cuff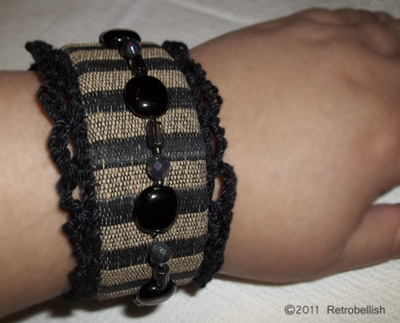
The finished cuff measured approximately 2 inches wide by 10 inches long. For fabric support, I used a 1/8 inch thick interfacing about a ¼ inch smaller than the fabric’s measurements. I wrapped the fabric around the interfacing and hand sewed the fabric with the seam in the back. I also sewed a small piece of solid black fabric over the seam in the back of the cuff to hide the seam and used a small black snap for the cuff’s closure.
Finished Denim, Lace and Pearl Pin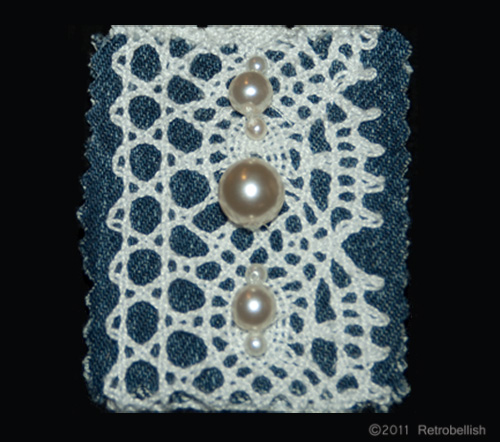
Recycling even the small scrap pieces of fabrics leftover from other projects could produce little fun pieces such as embellishments for other projects. I have a nice casual denim jacket that has an outside left breast pocket. The pocket is square in shape and I’ve always thought it would look nice with some kind of pin, but I didn’t like the look of any of the pins I have. I looked through my fabrics, trims and beads and combined a few things to see if I could make a pin for my jacket. I really liked the look of blue denim covered with a leftover piece of white lace trim. I looked through my beads and found some pretty white pearl beads of all different sizes. A few of the pearls looked nice over the white lace trim and both looked nice against the dark blue of the denim.
Reclaimed Grill Top Planter
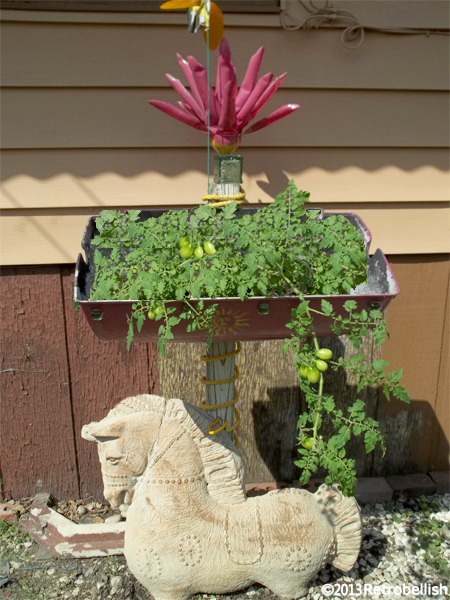
This reclaimed grill top planter was the second part to another grill project. The grill top was from another grill project. In that project we used the bottom of the grill
We first cleaned the grill top inside and out with a steel brush. Then we drilled four drain holes directly into the bottom for drainage. We drilled two holes on the higher part of the lid to mount onto the wood post using two galvanized screws (before the grill top was mounted, we painted the outside of it with a purple paint). Glass embellishments were glued around the front and sides of the grill. Our favorite sun design was painted on the front of the grill top using a stencil. The large wood base was a piece reclaimed from an old wood fence. The nylon roping around the wood post was reclaimed from a construction project done on our local street. We added some rocks to the bottom for easier drainage, then added two bags of organic potting soil. We then planted a Roma tomato plant that we purchased this year, and we’ll use some of these tomato seeds to plant next year. So always have fun recycling and reclaiming things that you can use to create whimsical and functional pieces for your yard.
The plastic soda bottle flower on top is made from a previous project Found Here The little green glass square vase used was chipped, but worked perfectly for this project as it has a sun face design on all four sides. We decided to place this cement horse underneath the planter to complete the piece. The cement horse had a broken head that we repaired many years ago and is still holding up perfectly.
Upcycled Mens Suit

The inspiration for this project came to me while cleaning out David’s closet this fall. We were taking down the summer clothes for the winter when I came across a few of David’s old suit jackets from his younger days which he had outgrown many moons ago. We decided to donate most all the clothes in the closet to the Salvation Army except a few pieces I decided to keep to upcycle. One was this navy-blue suit jacket and the other was an old pair of jeans. I have always loved to embellish the lapels of my jackets and I had an idea to use the jeans to make a hand painted applique for this suit.

I started out by trying on the jacket, pinning it to a length I liked and cut the suit 14 inches from the bottom edge using pinking shears to prevent the fabric from fraying. To create a smooth bottom edge, I measured a 1/4 inch hem, sewed it, and then used a cool iron. I then used a pencil and plain paper (taping a second piece of paper) to trace each lapel and part of the neckline area. I then carefully cut out a pattern for each side. I took the paper patterns and pinned them onto the denim. Using tailor’s chalk, I added a 1/4″ inch hem all the way around, then cut out the denim shapes. I sewed the denim pieces onto the jacket and carefully sewed on the neckline pieces as well. I also used extra denim pieces and leftover buttons from this jacket project to embellish the pocket. For further embellishment, I used a dark navy-blue permanent fabric marker to draw vines and leaf shapes onto the lapels and neckline.

When I had tried on the jacket, I knew the sleeves had to be shortened, so I left these for last. I measured the length that I liked, pinned the sleeves a bit longer for a hem, removed the buttons from each sleeve cuff, and cut the sleeves with my pinking shears. I sewed the hem, ironed and sewed on the buttons. I used what I had available to me at the time, but this project could also be accomplished with an old coat, a woman’s suit jacket or blazer. Thank you for stopping by! Just have fun and create your own.