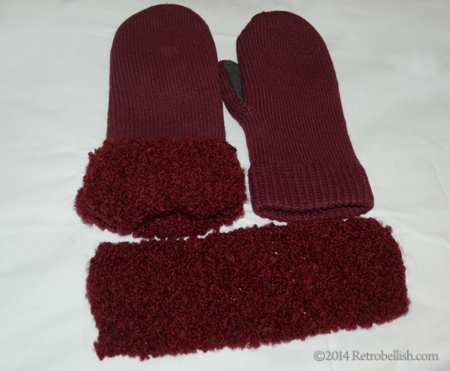
Upcycled Red Mittens
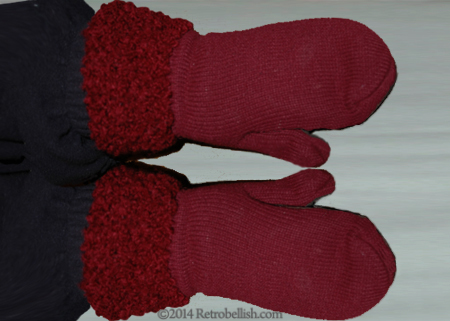
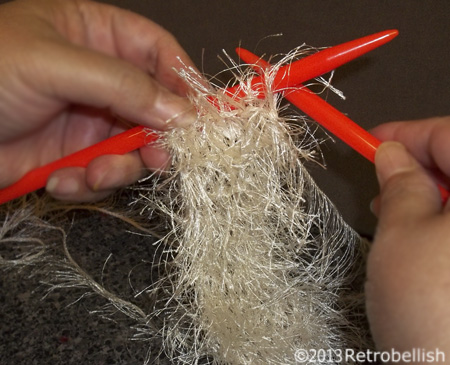
These red mittens are one of my favorites because of how warm they keep my hands in the winter months. They are not the prettiest mittens, but the wool knit and fleece lining do the job. Every so often, I’d wash them and hang them to dry so they wouldn’t shrink, but after a few years of use, the mittens began to look a little warn and the knitted edging around the wrists became stretched out of shape. Also, I wished the wrist length of the knitted edging extended longer beyond my wrists.
Since the length of the mittens didn’t extend past my wrists, I thought of finding the same color yarn, knitting an additional knitted trim to sew onto the existing knitted edging. The new knitted edging would also fit more snugly around my wrists and give the mittens a fresh new look.
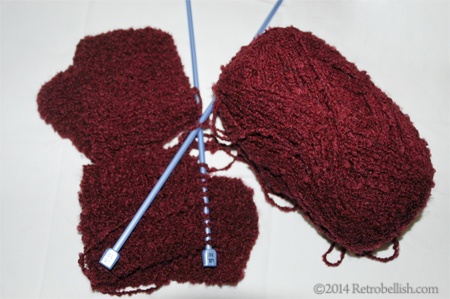
I used acrylic dark red yarn, size 10 knitting needles, cast on eleven stitches and knitted 30 rows for each edging. I then hand sewed the knitted edges to each mitten using heavy duty (dark red) sewing thread.
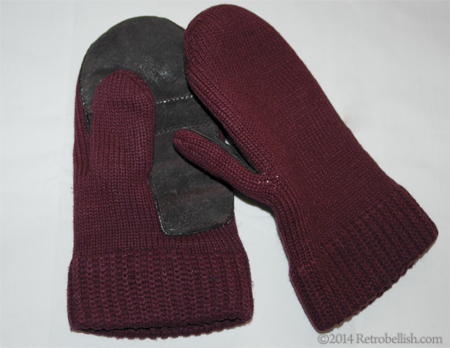
So don’t hesitate to give some of your old gloves or mittens a fresh new look by adding a decorative trim or embellishment. To see some of my previous glove embellishment projects, please click on the links below. And Thank You Very Much for your visit.
Other Glove Projects
Recycled Fleece Leopard Gloves
Embellished Blue Faux Suede Gloves
Embellished Tee-Shirt
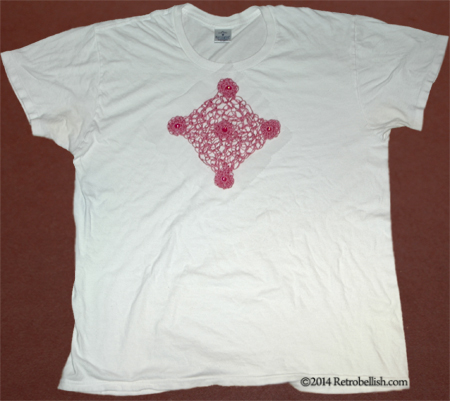
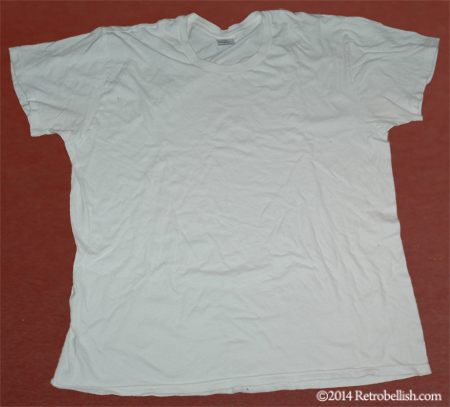
I love the beautiful crocheted and lacey trims I’ve seen on a lot of blouses and dresses. I have a comfortable but very plain white tee shirt that I’ve wanted to embellish for quite a while, and after seeing so many beautiful crocheted designs, I finally decided to try making my own crocheted embellishment to sew onto my tee shirt.
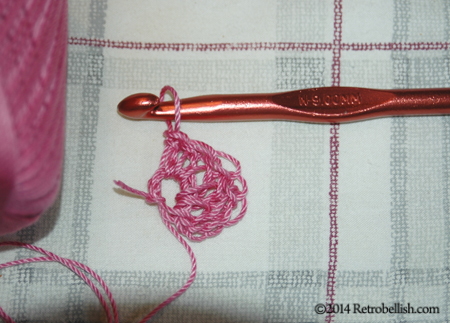
I chose a very pretty pink crochet yarn for this project (Size 3 Crochet yarn, 100% Mercerized cotton). For years, I’ve always loved a crocheted design on the center of an old scarf of mine, so I tried crocheting something similar using different sized crochet needles, but nothing I tried looked lacey enough. I then tried crocheting simple single stitches with my larger needles and that’s when I began to create an open lacey design that looked very nice.
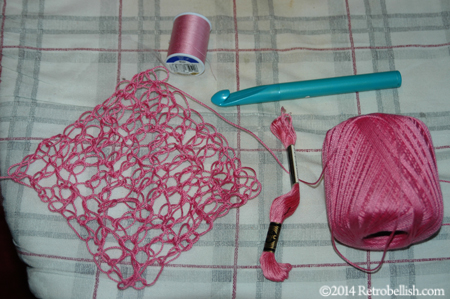
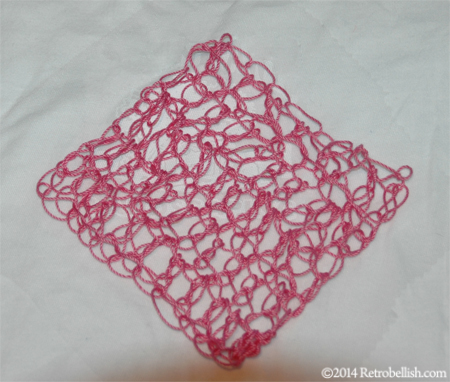
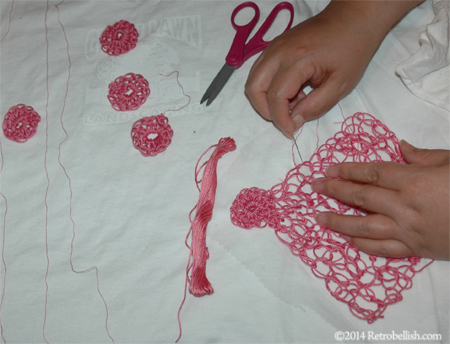
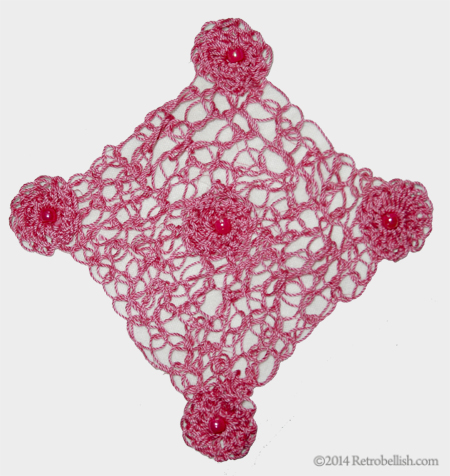
After trial and error, I found that a very large Size Q crochet needle created a loose pretty stitch I really loved. I decided to make a square shape so that when turned on its side it became a diamond shape. I single crocheted one row of 12 chains and then crocheted 12 rows of single stitches. The large open stitches of the crocheted square looked very nice when laid flat, but were very loose when I picked up the square shape. For stability I decided to sew the crocheted square in place on white tuling. I cut a square of white tuling (about an inch longer (on all sides) than the size of the crocheted square). Once I centered the crocheted piece onto the tuling, I trimmed away a little of the tuling all the way around. Using a sewing needle and a single strand of matching pink embroidery floss, I sewed the crocheted piece (on the white tuling) onto the tee shirt.
I wanted to further embellish the diamond shape at each corner and possibly in the center, so I made rosettes to adorn each corner of the crocheted diamond shape and another rosette in the center. I crocheted the rosettes using a Size N crochet needle, crocheting six single chains (using the same pink crochet yarn) and made 12 double-crochet stitches for each rosette. I repeated this four more times. Using pink embroidery floss and sewing needle, I sewed the rosettes onto the crocheted piece (making sure I sewed through the tuling and tee shirt as well). Using a sewing needle and pink polyester sewing thread, I sewed a large iridescent pink barrel bead through the center of each rosette.
Like so many of the other projects I’ve made here, this is only one example of how to embellish a tee shirt with a simple crocheted design. So just have fun creating a design of your own to embellish your tee shirt by just crocheting it and sewing it on.
Retrobellish Fashion Accessories
These are some of our previous reclaimed fabric projects about fashion accessories. Click on the pictures to read the whole articles. Reclaimed Fabric Red & Black Choker
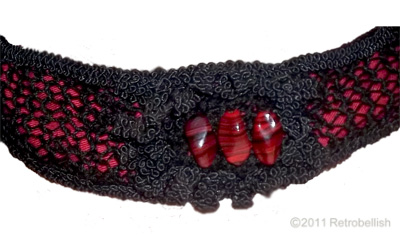
The choker was made from a leftover red fabric strip of soft thick cotton and a stretchy black netting that I knitted. I knitted the two pieces (using size 8 knitting needles and size 3 crochet thread–12 stitches wide by 36 rows). Next I hand sewed the edges of the finished knitted piece at the edges stretching it as I sewed it across the face of the red fabric to make the stitches wider and show off more of the red fabric. I then sewed on a trim all the way across on both edges.
Wearing Finished Beaded Fabric Cuff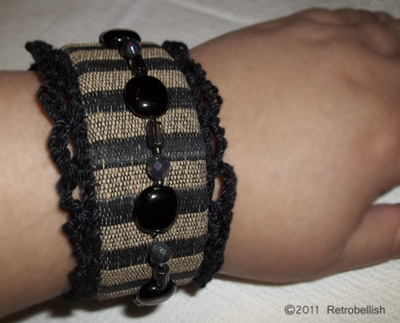
The finished cuff measured approximately 2 inches wide by 10 inches long. For fabric support, I used a 1/8 inch thick interfacing about a ¼ inch smaller than the fabric’s measurements. I wrapped the fabric around the interfacing and hand sewed the fabric with the seam in the back. I also sewed a small piece of solid black fabric over the seam in the back of the cuff to hide the seam and used a small black snap for the cuff’s closure.
Finished Denim, Lace and Pearl Pin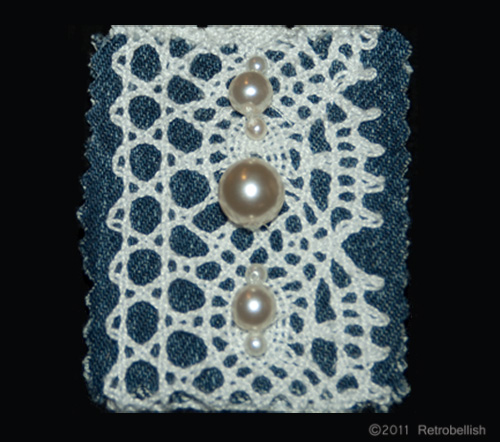
Recycling even the small scrap pieces of fabrics leftover from other projects could produce little fun pieces such as embellishments for other projects. I have a nice casual denim jacket that has an outside left breast pocket. The pocket is square in shape and I’ve always thought it would look nice with some kind of pin, but I didn’t like the look of any of the pins I have. I looked through my fabrics, trims and beads and combined a few things to see if I could make a pin for my jacket. I really liked the look of blue denim covered with a leftover piece of white lace trim. I looked through my beads and found some pretty white pearl beads of all different sizes. A few of the pearls looked nice over the white lace trim and both looked nice against the dark blue of the denim.
Reclaimed Retrobellish Purses
The following articles feature stylish purses made from reclaimed materials. These reclaimed purses were each featured blog posts in recent years. Each article describes the purse in an introductory paragraph followed by a link to the rest of the article including additional pictures.
Make Your Own Recycled Fabric Knitted PurseIt all started when I watched a craft show about knitting with fabric. The show featured a lady who sewed a simple summer dress in a smooth beautiful floral colored cotton fabric. The beautiful summer dress had an empire waistline, and although the top portion of the dress was fashioned in a tube top style, it had the most beautiful braided-like texture, and it tied at the shoulders with thin straps. The lady explained that she had created this beautiful texture by knitting it with strips created from the same floral fabric. I couldn’t believe how beautiful the dress looked. I immediately knew that I wanted to try this technique, although it would probably be on a smaller scale, and I came up with the idea of a small knitted purse.
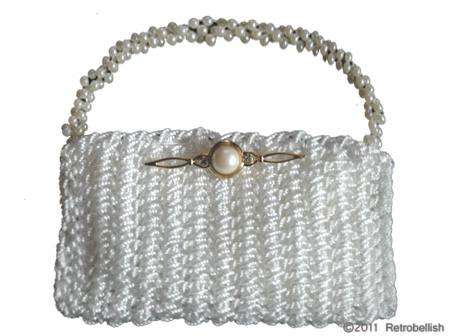
White Crocheted Pearl Purse
Just when I thought I couldn’t find any other type of fiber thread to crochet with, I found this Twisted Mason’s String Line in many colors at our local home improvement store. One of the pros I liked about this nylon string is that it’s very strong and lends itself to making very strong crochet pieces such as purses and straps. Other great qualities about this string is that it’s so soft to the touch and crocheting with it creates a great thick texture and an incredible satin sheen. It’s also waterproof.
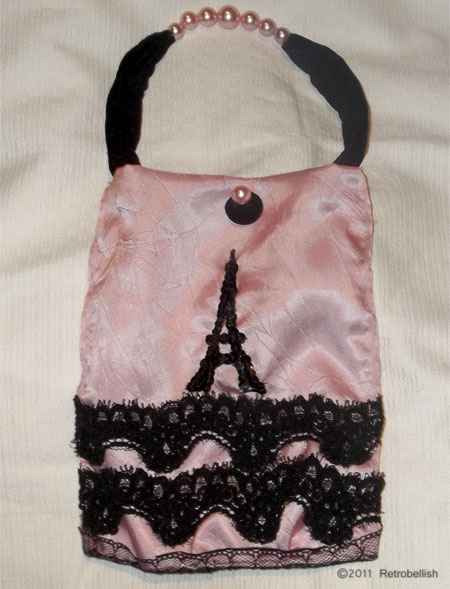
Reclaimed Fabric Paris Theme Purse
This small evening purse was made from the reclaimed fabric of a bridesmaid dress that I know I’ll never wear again. In the past, I’ve donated bridesmaid dresses, but there were only a few that I just couldn’t part with because the dress fabric was so beautiful. I saved these dresses, took my time taking them apart, saving the zippers, buttons and fabrics. As a big fan of all things Paris, I decided that I would use this beautiful pink silky fabric to make a Paris themed purse. The first thing that came to mind was the Eiffel Tower, so I decided to make an Eiffel Tower of sequins. I really didn’t know how this would turn out, but thought I’d give it a try.
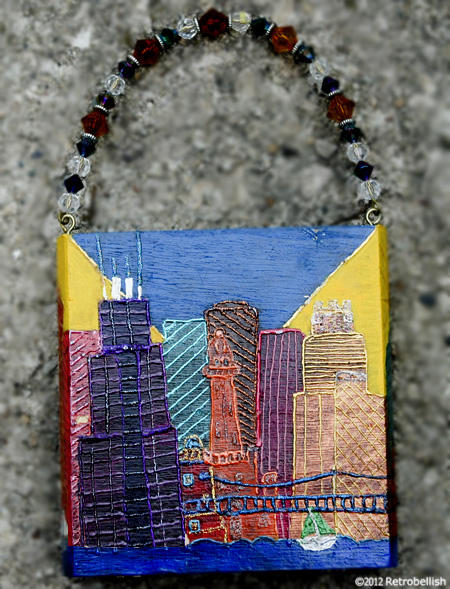
Cigar Box Folk Art Purse
Cigar box purses were once very popular and a great way to reuse these great boxes made out of wood or chipboard that could be used for a multitude of craft projects from jewelery boxes to purses. We used some of these for a lot of our folk art projects where we painted city and farm scenes on the boxes. The box featured here is an abstract rendition of our city of Chicago’s famous landmarks. And although this purse was used as folk art, some of our other pieces were functional purses lined inside with velour fabric and a small mirror.
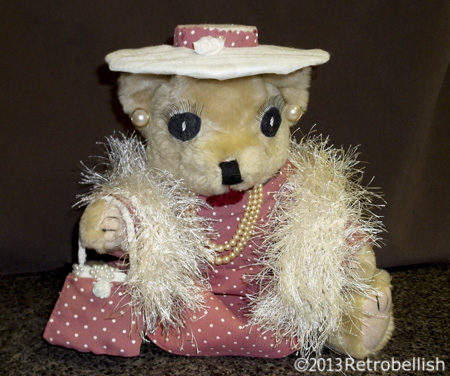
Reclaimed Teddy Bear
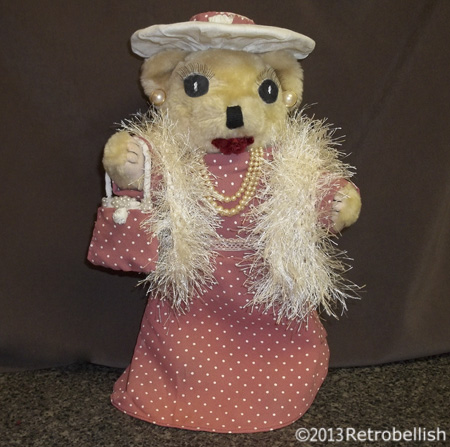
This recycled teddy bear project started from a beautiful but slightly damaged teddy bear that we bought at a craft store sidewalk sale in our neighborhood. The bear was a little dusty but nothing a little soap and water couldn’t remedy. The only thing wrong with this bear was that the eyes were ripped out and needed some kind of patches or replacement eyes. So I decided to start my next project with this bear because it had a nice color and the body joints were flexible. I was inspired to make a dress for the bear from an old deep pink polka-dot dress of mine that I had wanted to recycle for a future doll project. The bear was the perfect size and shape for this reclaimed fabric.
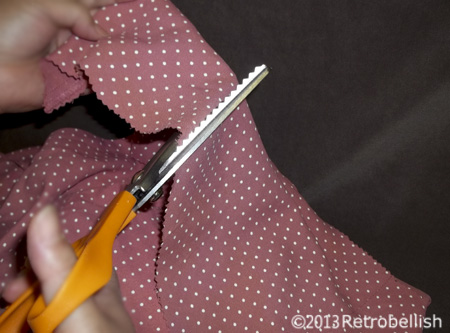
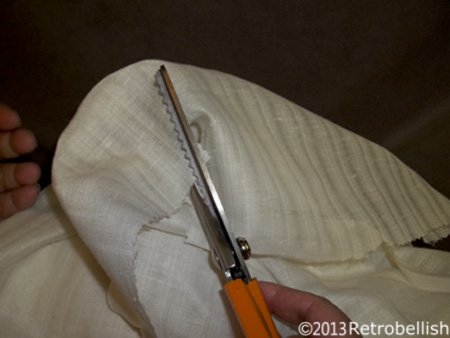
The bear washed nicely and after drying it thoroughly for several days, I laid the bear flat on craft paper that was larger than the bear. I took a pencil and traced an outline around the bear and marked the paper at the shoulders and legs (to determine the length of the dress). I then cut out the pattern, placed it against the different sections of the old dress to decide the best possible area to cut.
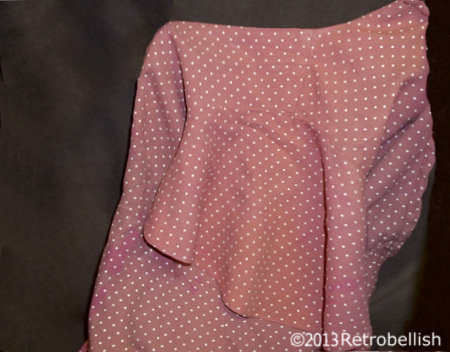
The old dress zipped on the center back and after placing the bear around different areas, I decided to try placing the actual bear inside the shoulder/sleeve section of the dress and found that the slight curve of the dress’s neck fit snugly around the curve of the bear’s neck and the dress’ floppy sleeve hung loosely around the bear’s wide belly like a skirt. There was plenty of fabric to fit all the way around the bear and more than enough dress fabric left over to make sleeves and a small purse. I designed a little purse and hat on paper.
I carefully cut the bear’s dress from the shoulder/neck section of the dress, made a few minor alterations and hand sewed the fabric to complete the back of the bear’s dress. I then traced out sleeve patterns, cut them out on the dress fabric and sewed the little sleeves to the bear’s dress. I then put the dress back on the bear and it fit very nicely. From my box of beads, I found many pearl beads I had left over from another project. I sewed a few pearl beads onto each sleeve cuff.
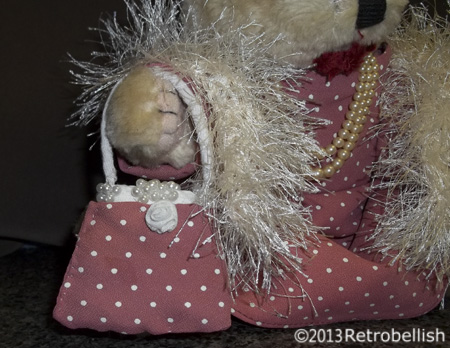
Next I traced the purse shape onto a thick piece of chip board and cut out more little cotton pieces from the cream colored blouse to cushion the little purse shape, then cut the dress fabric out for the little purse. For the purse strap, I cut a strip of cream colored cotton making sure to measure the strip length by wrapping it around the bear’s paw. I rolled up the strip and hand sewed the strap ends, one to each inside corner of the purse. I then covered the purse with the dress fabric and sewed the seam to one side of the purse. I placed a bit of cream colored fabric in the top center opening (and over the chip board insert) of the little purse and sewed more pearl beads onto the top and corner sections of the little purse.
Using matching tan colored thread, I sewed close each eye opening where the button eyes had been ripped out. In my remnant box of fabrics I used the same cream colored cotton blouse that I used to make purse parts. This particular blouse had a wide thick cotton band around the top and bottom edges. I cut out two circles on paper and held them up to the bear. After trial and error I found the perfect size eyes. I then traced the paper circles onto the blouse’s wide band and cut out two thick cotton circles. I sewed on the eyes and used a black dye fabric marker to color in the eyes. I then used white fabric paint to dot the center of each eye. The eyelashes I used were leftover from Halloween and I used fabric glue to affix them over each eye.
I found an old pearl necklace and pierced earrings, which I used to adorn the bear. I decided a cream colored shawl would look nice against the cream colored polka-dots, so I knitted a shawl using cream colored fun fur and size 11 knitting needles. I cast on 7 stitches and kept knitting until the shawl reached the length I liked on the bear. I also made the deep red lips on the bear by hand sewing a small length of deep red chenille yarn to the bear’s mouth area.

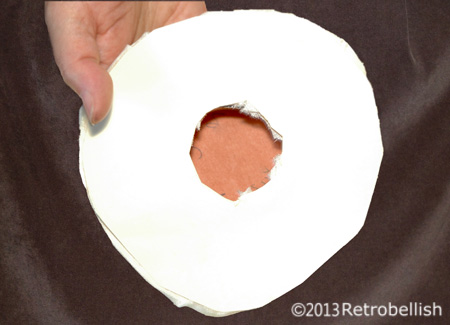
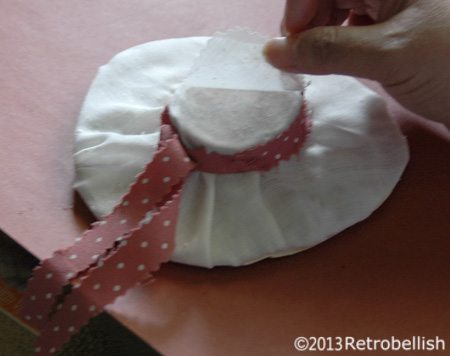
The hat was made from part of a recycled brown (thick cardboard) accordian pocket folder. Again, I measured and cut a big circle out from craft paper, put the cut paper circle on the bear’s head as this would measure the brim of the hat. I then made a couple of adjustments to the paper circle, traced it on cardboard and cut it out on the thicker cardboard. I cut the center of the circle in the center of the hat, rolled a smaller strip of the thick cardboard slightly inside the edge of the open hole (used glue along the edges), cut the a circle from the same chip board to complete the crown of the hat (also using glue to attach the circle to the crown). Next I used a remnant piece of cream colored fabric to cover the hat. I used a small strip of the polka-dot fabric to make a band around the rim of the hat.
Although I used this damaged bear to work on this project, you can always use one of your own bears or an old doll. Just remember to have fun creating your own piece of art.