Reclaimed Grill Top Planter
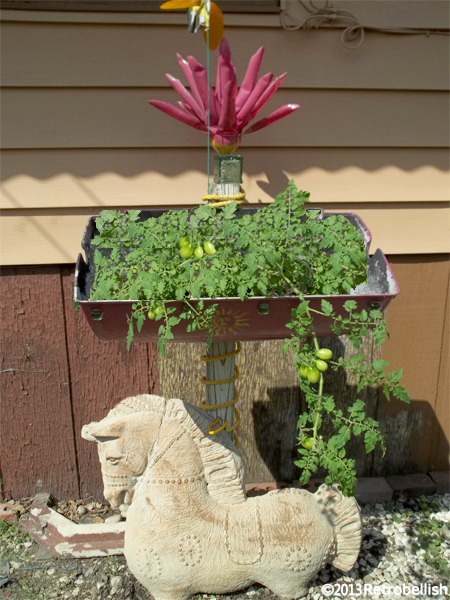
This reclaimed grill top planter was the second part to another grill project. The grill top was from another grill project. In that project we used the bottom of the grill
We first cleaned the grill top inside and out with a steel brush. Then we drilled four drain holes directly into the bottom for drainage. We drilled two holes on the higher part of the lid to mount onto the wood post using two galvanized screws (before the grill top was mounted, we painted the outside of it with a purple paint). Glass embellishments were glued around the front and sides of the grill. Our favorite sun design was painted on the front of the grill top using a stencil. The large wood base was a piece reclaimed from an old wood fence. The nylon roping around the wood post was reclaimed from a construction project done on our local street. We added some rocks to the bottom for easier drainage, then added two bags of organic potting soil. We then planted a Roma tomato plant that we purchased this year, and we’ll use some of these tomato seeds to plant next year. So always have fun recycling and reclaiming things that you can use to create whimsical and functional pieces for your yard.
The plastic soda bottle flower on top is made from a previous project Found Here The little green glass square vase used was chipped, but worked perfectly for this project as it has a sun face design on all four sides. We decided to place this cement horse underneath the planter to complete the piece. The cement horse had a broken head that we repaired many years ago and is still holding up perfectly.
Recycled Cardboard Plaster Reliefs
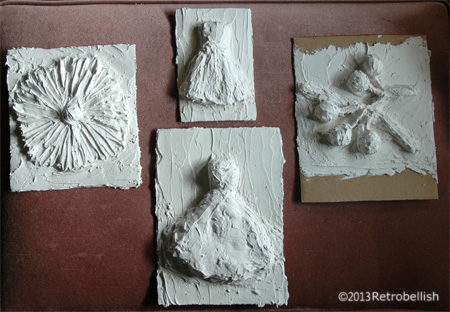
These small plaster reliefs started out from a cardboard and paper recycling project. I had saved several boxes from our favorite wheat crackers because they’re made of a very nice grade of cardboard that was sturdy yet flexible. I had fun thinking of different mediums I could try on these cardboard pieces and remembered a past project where I had used plaster on Styrofoam and wood. I wondered if I could try making a similar craft using these recycled cardboard pieces.

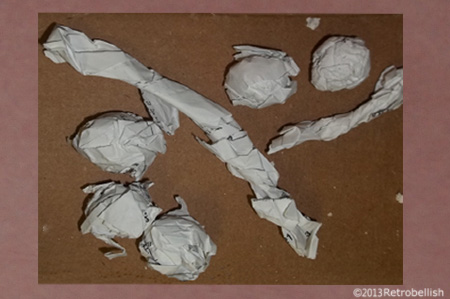
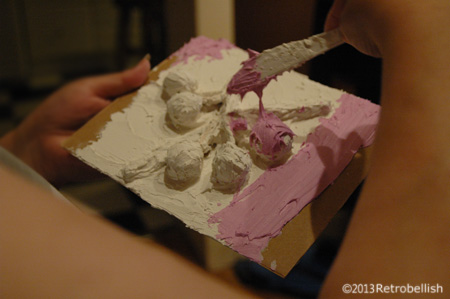
I decided to make a few little abstract dresses and other pieces. I took some newspapers we were recycling, tore some pages into medium sized pieces, crumpled and twisted them up into medium chunky pieces. I used several of the 4″ x 6″ cardboard pieces as the base for the dresses. I dabbed a little fabric glue onto the center areas and placed the bulky crumpled pieces of newspaper onto these dabs of glue so they could remain stationary for the next step. I decided to use a wall repair plaster that is pink and soft (like frosting) in it’s original form, but hardens and dries white in color. Once the chunky paper dried on the glue, I used a plastic knife to spread the plaster over the paper and smoothed it over the chunky paper.
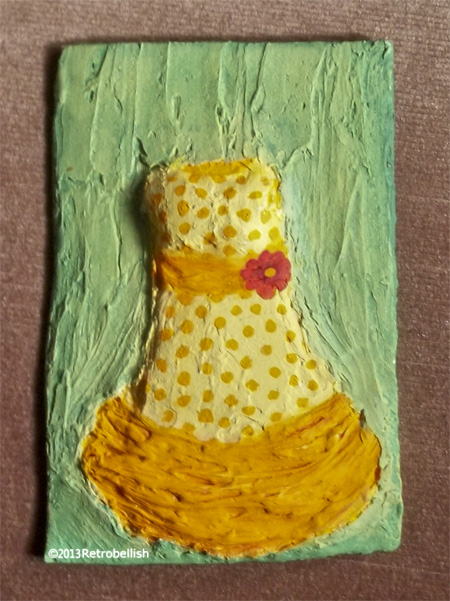
It takes a little while to get used to this medium, but its easier to work with if you let the first layer dry overnight. It is then easier to work the plaster, shape it into a simple dress form and smooth out uneven areas. Once the entire piece was thoroughly dry, I painted it with gesso and let that thoroughly dry. I then painted the dress using yellow and orange acrylic craft paints. Once the paint dried, I spread plaster mixture onto the background to give it texture as well. When the background dried, I repeated with gesso and painted it a light green.
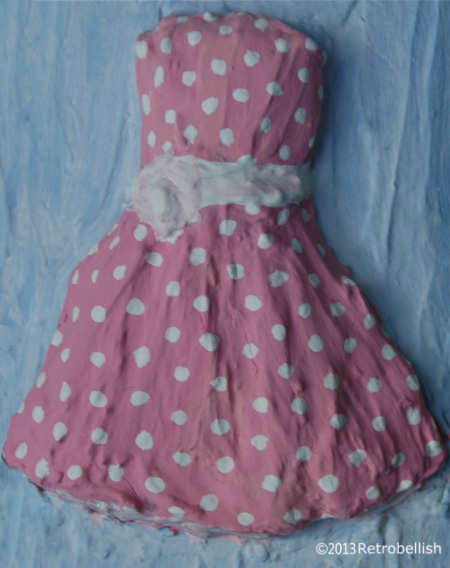
When I made the second dress (pink polka-dot dress), I made sure to use plaster mixture on the background after the dress form dried (something I didn’t do with the first yellow and orange polka-dot dress). After the second dress dried, I painted the entire piece with gesso and let it dry. I next painted the dress, and then painted the background. I painted the polka-dots on each of the dresses after their base solid colors were completely dry.
And again, although I had fun making these abstract pieces you see here (dresses, fruit, and flowers) don’t be afraid to try your hand at anything theme you like. Just have fun creating your own pieces of art.
Lawnmower Wheel Decor
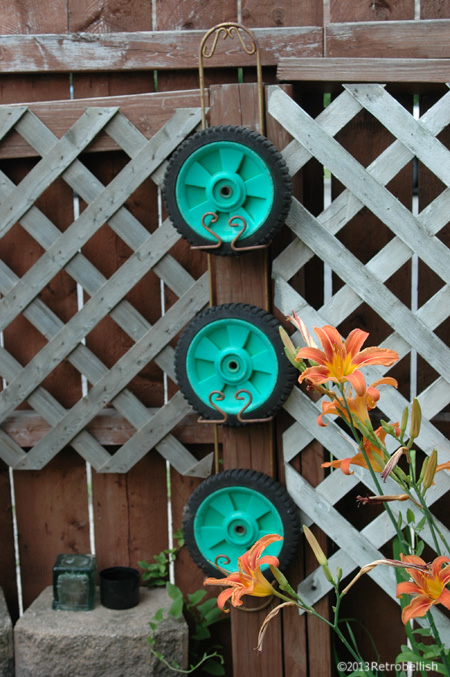
This piece was made from three wheels from an old lawnmower and a old decorative plate holder. It adds color and charm to the yard. This time around we could only reclaim a few items from this old lawn mower.
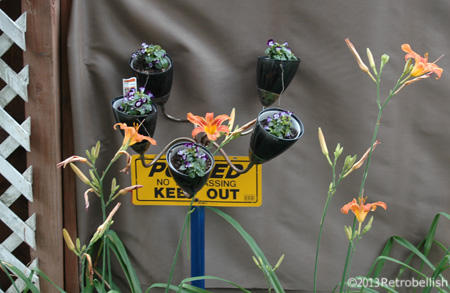
Recycled Lamp Planter
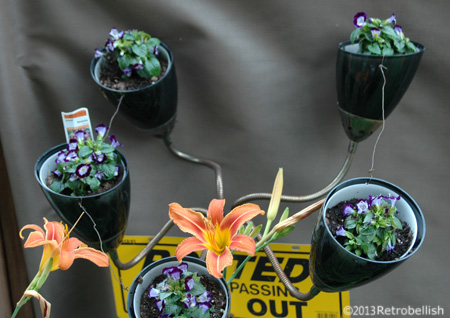
This recycled lamp planter was a trash find. We removed the stand from the top of the lamp and used it as a stand for my clothing projects. We then used the top of the lamp as a planter for small plants. The blue tube base is from a recycled piece of chain link fencing. The no trespassing sign we had lying around for many years. All combined, this piece adds a little whimsy to our yard.
Mache Forest Maiden Mask
Paper Mache Forest Maiden Mask
In the past, I’ve often made small paper mache items, but some of my favorite pieces I’ve had the most fun with are the small masks. I’ve always wanted to try making a larger version paper mache mask. I thought about the many different style masks I’ve seen in the past. I had fun drawing several rough sketches and finally decided to try making a mask that looked like a forest maiden with leaves for hair.
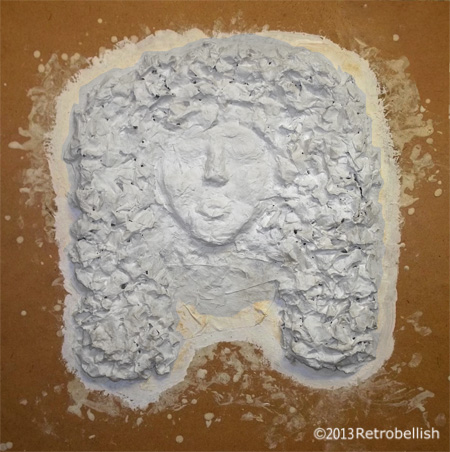
I found a large piece of Masonite board in the garage that I thought was the perfect size base for my mask. I dusted off the board and wiped it clean. I then gathered a stack of old newspapers and started tearing up sheets into medium size pieces (about 2 to 4 inch pieces). I continued until I had a large pile of torn up newspaper pieces. I then made the paper mache paste using flour and water – with a dash of salt as a preservative.
I took some of the larger newspaper pieces and started soaking them into the paste mixture. I then started the mask with the face by placing some of the bigger soaked chunks down on the board. Once I started forming the face, I started to place smaller soaked pieces on top of the base pieces by laying them on as smoothly as possible.
Once I had something resembling a pleasing shape of a face, I worked on building up the forehead, the eyebrow areas and then the cheek bones. I rolled and soaked several torn pieces together and placed those large soaked pieces in the area where the nose would go and then did the same with the mouth. I decided to make her mouth open as if she was whispering to nature. While the face was drying, I worked on the hair, which I tried as closely as possible to resemble leaves. I had to let the basic parts of the mask dry before adding on additional layers over certain parts of the face and hair. It is an abstract piece and once I felt it was done, I was very pleased with the entire piece because I was able to make it look closely to what I had imagined.
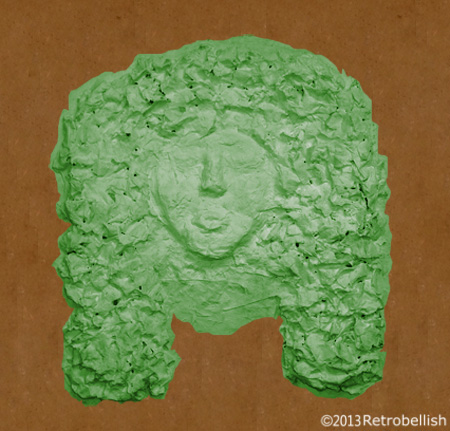
I had started this mask project on a weekend and after the base layers dried for several days, I waited until the next weekend to add the final layers that needed to be built up. Once, I knew the mask was completely dry, I painted a coat of gesso on the entire piece. I let the gesso coat dry overnight. I then painted a base green color over the entire piece on which I will add to at a later date. I really enjoyed making this mask, and although I used old newspapers, you can always use magazines or scrap paper of any kind to make this project.