Mache Forest Maiden Mask
Paper Mache Forest Maiden Mask
In the past, I’ve often made small paper mache items, but some of my favorite pieces I’ve had the most fun with are the small masks. I’ve always wanted to try making a larger version paper mache mask. I thought about the many different style masks I’ve seen in the past. I had fun drawing several rough sketches and finally decided to try making a mask that looked like a forest maiden with leaves for hair.
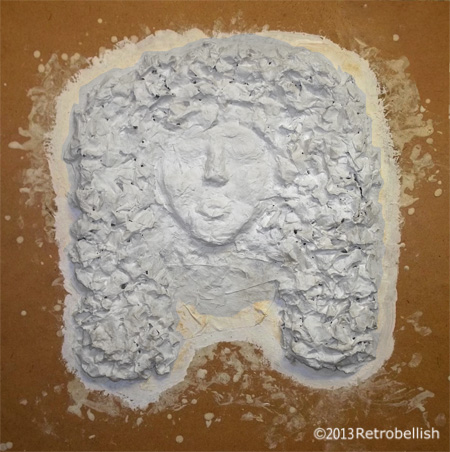
I found a large piece of Masonite board in the garage that I thought was the perfect size base for my mask. I dusted off the board and wiped it clean. I then gathered a stack of old newspapers and started tearing up sheets into medium size pieces (about 2 to 4 inch pieces). I continued until I had a large pile of torn up newspaper pieces. I then made the paper mache paste using flour and water – with a dash of salt as a preservative.
I took some of the larger newspaper pieces and started soaking them into the paste mixture. I then started the mask with the face by placing some of the bigger soaked chunks down on the board. Once I started forming the face, I started to place smaller soaked pieces on top of the base pieces by laying them on as smoothly as possible.
Once I had something resembling a pleasing shape of a face, I worked on building up the forehead, the eyebrow areas and then the cheek bones. I rolled and soaked several torn pieces together and placed those large soaked pieces in the area where the nose would go and then did the same with the mouth. I decided to make her mouth open as if she was whispering to nature. While the face was drying, I worked on the hair, which I tried as closely as possible to resemble leaves. I had to let the basic parts of the mask dry before adding on additional layers over certain parts of the face and hair. It is an abstract piece and once I felt it was done, I was very pleased with the entire piece because I was able to make it look closely to what I had imagined.
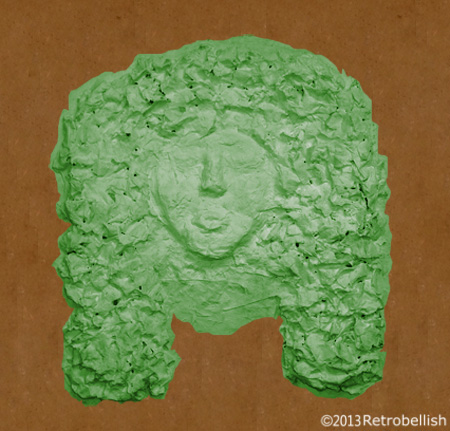
I had started this mask project on a weekend and after the base layers dried for several days, I waited until the next weekend to add the final layers that needed to be built up. Once, I knew the mask was completely dry, I painted a coat of gesso on the entire piece. I let the gesso coat dry overnight. I then painted a base green color over the entire piece on which I will add to at a later date. I really enjoyed making this mask, and although I used old newspapers, you can always use magazines or scrap paper of any kind to make this project.
Reclaimed Paper Wedding Dress
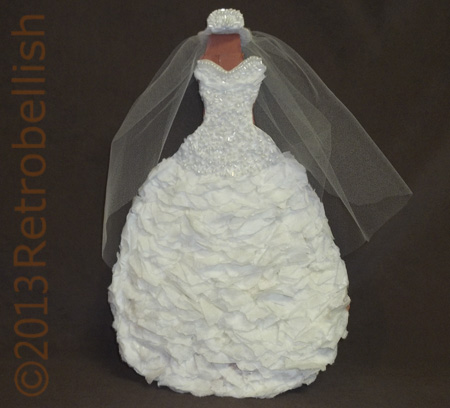
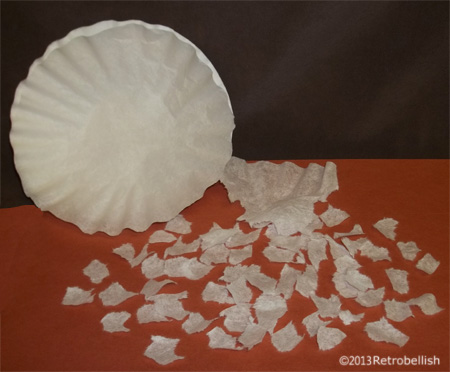
This was a very simple and fun project that started out with some coffee filters that had gotten wet in soapy water. Not wanting to throw away the filters, I set them out to dry and then stored them for a future project. Although this happened a few years ago, I saved them and they were still in good shape. I have been crafting with recycled manila folders for a long time because this sturdy cardboard lends itself to a lot of recycled craft projects. While cutting out a doll form for another project, I got the crazy idea to use the coffee filters as a combination of collage and paper mache.
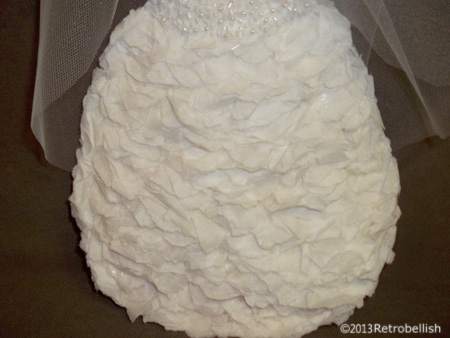
The soft fluffy feel of the coffee filter gave me an idea. I decided to tear up little thumb-nail size pieces, gluing only a tiny edge of the torn piece to the cardboard dress form, and leaving the rest of the torn fluffy piece hanging freely on the cardboard. When gluing the torn rough-edged pieces very close together, the overall look of the rows started to look like light fabric ruffles on a dress.
I then decided to stop at a certain point and glue beads to the top part of the dress. I traced the top part of the cardboard form onto plain paper and cut out that paper shape. I drew different designs and held them up against the top row of ruffles until I found one I really liked. I then glued bigger filter pieces to the top part and all the way down to the dress hip area as a base on which to glue on the white beads. I glued the white beads following the drawn design and was happy to see the beads were staying in place, and better yet, I didn’t have to sew on each bead, (although I love hand sewing ) .
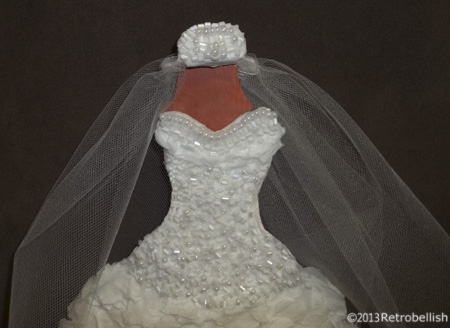
The simple veil was made from two small pieces cut from the same cardboard manila folder. I cut out a one inch oval shape, poked a hole in the center of the oval shape and cut out an opening leaving a 1/4 inch ring. I then folded one (shorter) edge of the oval shape forming it into an L shape. I then cut out a smaller oval shape from the cardboard and cut (about 1/8 inch) from the bottom edge (of the longer side of the oval shape). I then glued the smaller oval shape (straight edge down) to the larger oval shape making sure the flat side of the L shape was lined up against the straight edge of the smaller oval shape. I cut small coffee filter pieces and glued them entirely over the brown of the cardboard veil. I then glued on the same white beads to the front of the veil in a pretty pattern. I cut out a piece of white tuling I had in my remnants box, basted one edge and trimmed a complimentary shape by placing it near the dress, and then sewed the basted edge around the back opening of the cardboard veil. For picture purposes, I displayed the veil near the dress by taping a small piece of cardboard behind the dress neckline.
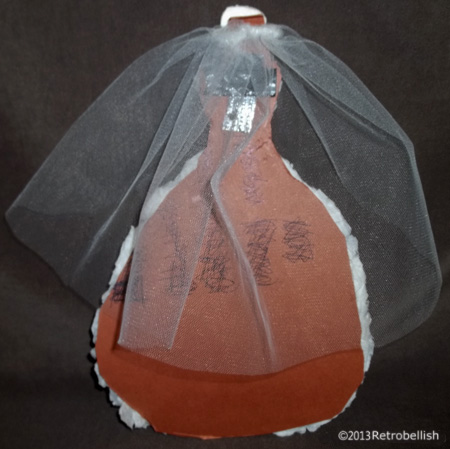
The frame we used for this project was made from recycled pieces of wood leftover from other projects and stained with a dark brown latex stain. Although I reused coffee filters, recycled manila folders and embellishments, one can make this project using any kind of paper and cardboard. This also makes a great project to work on with family and friends. So always remember to just have fun and create your very own piece of art.

Fabric Marker Embellishment

Sometimes simplicity is best, as with the case of this blouse I bought on sale last year. I really loved this blouse, especially the beautiful beading it already had around the neckline. The only thing I didn’t like was the plain white V patch on the front center of the blouse. I thought of sewing a piece of fabric over the patch from some of my beautiful remnants I had laying around from other craft projects, or even cutting the piece out completely, but the crafter in me decided to try my black fabric marker to create some kind of design.

I measured the white V patch on my blouse and traced several similar sized triangles on white paper. I drew many paisley designs on paper until I drew some designs I really loved, which turned out to be a flower, a leaf and some hearts. I then copied those designs onto the triangles until I liked their positions next to each other. I then used a permanent ink black fabric marker to draw them onto my little white V patch on my blouse. I took my time and figured that if I made a mistake, I could always go to plan B and sew a small beautiful fabric piece over the existing V patch. I was very happy with the results and even inspired to try it on one of my other plain white tee shirts (which I will definitely share on a future post).

Reclaimed Silk Flower Topiary

This reclaimed silk flower topiary started out as an idea I had after making some miniature topiary center pieces for a bridal shower. For the miniature topiary base I used some shot glasses that I purchased at a local thrift store. As I looked through my craft box, I found I had all the materials needed to make a big topiary from leftover craft materials I had collected over the years. I found a large shabby Styrofoam ball, a dowel rod, a variety of silk flowers and leaves left over from my many previous floral craft projects. I had an old planter in the basement that I cleaned up and decided to use for the base.
I first painted the dowel rod with a brown craft acrylic paint so that it would resemble a tree branch. Once the painted dried, I inserted the brown dowel rod into the center of the Styrofoam ball. The Styrofoam ball was kind of beat up, but it didn’t matter because it was going to be covered with the flowers and leaves.
I had many large yellow sunflowers, purple little blossoms, and many leaves in various shapes, sizes and shades of green, so I decided these were the materials I would use to make the topiary. I then separated all of the leaf varieties and chose the ones I would use to cover the background surface of the Styrofoam ball. I started by cutting the flower stems and leafy branches to a uniform length, leaving the stems long enough to insert into the Styrofoam ball. On a table, I laid out the flowers and leaves to get an idea of how to evenly distribute them over the surface of the Styrofoam ball. I then started inserting the flowers and leaves in a small area, and continued until I found a very nice pattern, which I continued until I covered the entire surface of the Styrofoam ball.

Once I finished covering the surface with the flowers and leaves, the topiary looked very nice and full, but then the dowel rod looked kind of thin in comparison to the volume of the topiary, so I went to my backyard and found a couple of small tree branches that I thought might look good tied to the dowel rod for extra dimension. It worked, because after using some gold ribbon to tie the branches to the dowel rod, the branches definitely added more bulk, but also made the dowel rod look like a branch as well.
For weight, I mixed some Plaster of Paris and poured it into the planter and held the dowel rod in the center until the plaster dried enough to let go. I let the plaster dry for a few hours before touching up the flowers. I added a few remnant leaves and flowers at the base of the topiary to hide the smoothness and white color of the plaster base. And although I used Plaster of Paris, other items such as rocks, dirt, cement and reused Styrofoam can also be used to weigh down the topiary. So have fun looking through your craft supplies and maybe you’ll be surprised to find that you have a lot of fun materials to make your own topiary in any size, shape and color.
Vintage Lacey Blue Hanky

This blue vintage hanky started out from one of my many botanical print fabric pieces that I’ve collected throughout the years. I also used the same fabric in a previous post titled “Something Blue,” which was a small fabric pouch with potpourri used as the “something blue” for a bride-to-be. The fabric lends itself to many projects and is so visually pleasing to me. One of the ideas I thought of after making the other project was to use it to create something reminiscent from the Victorian age, yet modern.
I thought of making this dainty little hanky and used the same vintage blue bontanical print fabric to make the 4″ x 4″ square. I cut the cotton fabric with pinking shears to minimize fraying and placed it over a solid cream colored fabric cut in the same size. I then placed the straight edge of the lace in between the botanical print fabric and the cream colored fabric and hand sewed a simple running stitch to bind all three pieces together. I then placed the blue silky ribbon over the sewn edge to hide the stitching and used navy blue thread to sew on the ribbon, making sure the needle went through all layers. The last touch was to sew a little bow on each corner of the hanky. I made the bows from the same variegated blue ribbon with no specific measurement. The bows were hand sewn onto each corner with navy blue sewing thread.
Again, although I used this specific botanical fabric I had collected, this piece could also be made from an old scarf, an old shirt, or even an old dress or skirt. All you need is a 4″ by 4″ piece of any fabric you like, some ribbon and lace that could be reclaimed from an old dress or lacy collar. One could even use fabric glue to bind the pieces without any sewing. So just have fun and create your very own vintage hanky.
