Recycled Coffee Cans
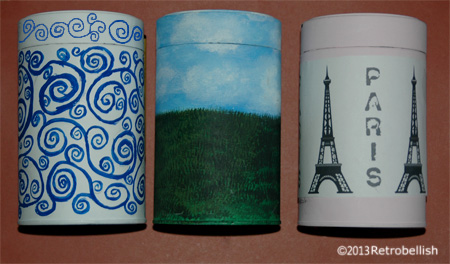
These recycled tin coffee cans make great craft storage containers. The three cans featured here are examples of three simple, yet very different ways to decorate these tin coffee cans. The first one was decorated by painting the background a solid white color with acrylic craft paint. After the white paint dried, I used a pencil to lightly draw a pretty swirl design, and then painted over the pencil design using a bright blue acrylic craft paint. I plan to use this coffee can to hold my colored pencils in my craft area, and which also matches the pretty blue and white motif on my stapler (recently featured in a separate post). Instead of painting a design, you can also use fun colorful stickers or even cut out your favorite designs, animals, letters or pictures from magazines and glue or Mod Podge them right onto the coffee can.
On the second coffee can featured here, I painted a light blue background depicting a sky on the top half of the can and a dark forest green on the bottom half of the can. After the paint dried on the coffee can, I used a true green acrylic craft paint using a fan-shaped paintbrush to make tiny strokes to depict grass blades against the (dried) dark green background. I then used watered down white acrylic craft paint to paint in light fluffy white clouds against the light blue sky. I plan to use this scene as a background on which I will paint a farm scene with a red barn, trees and farm animals (definitely a future post).
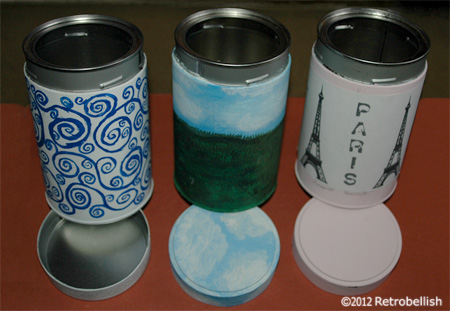
I painted the entire third coffee can with a light pink acrylic craft paint because I planned to use a Paris theme to decorate this coffee can. This time I used my printer to print out a Paris Eiffel Tower and pretty lettering in black. I found the contrast of the black decorations against the light pink background very pretty. It was great recycling these coffee cans, which are great for storing pens, pencils, crayons and many other craft items. So just have fun thinking of the ways you can create and recycle coffee cans, glass jars or other containers to store any of your favorite things.
Scrap Styrofoam Relic

This project started out with a large broken piece of insulation Styrofoam, some scrap wallpaper and a scoop of leftover dry wall compound that we wanted to recycle. We decided to try to make some kind of art from these leftover materials. The great part of this project was that the art piece would be very light and hang on any wall with just a small nail or piece of double-sided tape. I decided to try and make some kind of faux stone tablet relic.
I started out by breaking away pieces from the edges of the Styrofoam in an uneven pattern all the way around to give it a broken stone tablet look. I then added a coat of drywall compound across the whole front and sides of the Styrofoam piece, and then cut pieces of the scrap textured wallpaper about an inch shorter from the edges of the Styrofoam (loosely following the jagged shape of the Styrofoam) and pushed it right into the drywall compound. Using my hands, I smoothed some drywall compound over the wallpaper covering most of the wallpaper edges, but smoothing out the compound to reveal the main wallpaper details.
While the piece was still damp, I painted the whole thing with a taupe acrylic enamel paint. The reason for this was to get the deep taupe color into the drywall compound while drying and with a damp paper towel I gently removed some of the paint away from the details. I then let the piece dry for a few days and repainted the whole piece again, highlighting the raised points with a darker taupe to accent the piece. After everything was dry, I placed a very small nail into the wall and gently pushed the Styrofoam art piece into the small nail. Styrofoam is a very versatile and fun medium to work with because of its light and smooth surface — it lends itself to many craft projects.
Plastic Bottle Trash Art Flowers

One of the most important elements of crafting for us is to recycle as much as we can. The house is a great place to start recycling projects because it is easy to see what objects we tend to throw out the most in our trash. Whether it’s plastic, paper, glass or metal, it is a challenge to find creative ways to incorporate the trash materials into our arts and crafts. One way we thought of adding color to our yard all year round here in Chicago was to make some kind of art with plastic pieces. And what better medium to reclaim than 50 plastic soda bottles for flowers we had in mind. We started to cut the plastic bottles in different strip cuts to imitate flower pedals.


After we cut the pedals in different dimensions to create different style flower pedals, we painted the back of the pedals with vibrant enamel colors. Next, we let them dry and took an 18 inch long dowel rod that we had recycled from old VHS racks we had taken apart. We hand painted the dowel rods with a green indoor- outdoor acrylic paint. When we cut out the initial pedals, we cut out the bottom of the bottles all the way around and these are what make the center of each flower. We next painted the flower centers in complimentary colors to the flower colors. We then placed the painted bottom (used as the center of the flower) over one end of the dowel rod and drilled a screw right in the middle of the center and into the dowel rod.
This creates the middle center of the flower. Next we took three of the bottles we had painted and flipped them upwards. We then took a green bottle to create the leaves and placed this first on the dowel rod. Next we placed one of the flower pedals and pushed it up tightly onto the dowel rod. Then we drilled a screw under the edge of the last bottle/flower pedals to hold them in place. You can rotate each row of bottles/pedals to align the flower pedals to look any way that you’d like. The flower pedals can be painted in any color combination that you’d like. We left our flowers outside throughout the entire winter and they looked beautiful against the white snow. These recycled plastic bottle flowers allow you to have a beautiful colorful garden all year round.

Not only is recycling great for our environment, but it is also a fun way to craft with family and friends.

Manila Folder Abstract Collage

This clothes line abstract collage started out as trashed manilla folders that were being thrown away. I really liked the thickness of these expandable folders and their chipboard-like quality gave me the idea to cut them into sections and store them in my scrap folder for future craft projects. The wood frame was one of several frames bought on sale a while back, which were also saved for future craft projects.
I was inspired with the idea for this art collage when I saw a movie which featured a little house in the countryside. In one yard scene, there was a line full of very colorful clothes billowing in the breeze and it was interesting that you could surmise there was a baby and children of different ages living in the house just by the variety of clothes hanging on the line. I thought, what a beautiful picture this would make, and then thought of this idea to have different types of clothes hanging from a line. The frame (on the outside edges) measures 6-1/2 inches in length by 11-1/2 inches in width.

I measured the back inset of the frame, drew these measurements onto a large piece of the reclaimed cardboard and then cut out the rectangular cardboard which served as a background to support the art pieces. One side of this reclaimed cardboard was a cream color, which was perfect for me to paint the country scene. I used regular acrylic craft paints for the sky and the clouds. Much later, I decided to paint some daisies throughout the scene.
To make the scale of the clothing seem as realistic as possible, I looked through my old fabric remnants for the smallest prints I could find. I then placed the little cardboard shapes onto their respective fabrics and by eye traced each shape onto the fabric (leaving about a 1/4 inch margin all the way around the shape), and then cut out the traced shapes. Next, I used a toothpick to dot a little bit of hot glue (from my hot glue gun) onto each tiny cardboard edge, glued the fabric edge onto the dot of hot glue. Once the cut out fabrics were hot glued to the cardboard cutouts, I let them dry thoroughly. In the meantime, the tiny white striped shirt, white socks, and polka-dot towel were made from plain white cotton, but I used different colored fabric markers to paint on the little stripes and polka-dots. I also used the reclaimed cardboard to make the laundry basket and a brown fabric marker to draw a weave-like pattern on the basket. I used round toothpicks and wire cutters to make the tiny wooden clothes pins, which were carefully hot glued on the string and clothing item by using a toothpick and tiny dot of hot glue.

I used more scrap pieces of cardboard and cut two long strips to make the wood posts. I hot glued some white string near the top of each post to use as the clothes line. I cut out many more small pieces of the thick reclaimed cardboard scraps and hot glued many tiny sets of three little squares together to glue behind each item and make them stand out from the background and give each piece more depth.
I had so much fun making these pieces from reclaimed cardboard and since I cut up many more expandable folders that were thrown away, I will definitely be making another similar project in the near future — stay tuned.

Forest Maiden Paper Mache Mask
In the past, when working on paper mache projects, I’ve always made small paper mache items, but I’ve always wanted to try making a large paper mache mask. I thought about the many different style masks I’ve seen on television, in books and at museums. I drew several rough sketches on paper and finally decided to try and make an abstract mask that looked like a forest maiden with leaves for hair.
I found a large piece of masonite board in the garage that I thought would be a perfect size base for my mask. I dusted off the board and wiped it clean. I then gathered a stack of old newspapers and started tearing up sheets into medium size pieces (about 3 to 6 inch pieces). I continued until I had a large pile of torn newspaper pieces. I then made the paper mache paste using flour and water – with a dash of salt as a preservative.
I took some of the larger newspaper pieces and started soaking them into the paste mixture. I first started the mask with the face by placing some of the bigger soaked chunks down on the board. Once I started forming the face, I started to place smaller soaked pieces on top of the base pieces by laying them on as smoothly as possible.
Once I formed a shape resembling a pleasing face, I worked on building up the forehead, the eyebrow areas and then the cheek bones. I rolled and soaked several torn pieces together and placed those large soaked pieces in the area where the nose would go and then did the same with the mouth, which I decided to make slightly open. I then worked on the hair, which I tried as closely as possible to resemble leaves. It is an abstract piece that measures 16 inches in length and 14-1/2 inches wide (the board measures 24 inches by 24 inches). Once I felt it was done, I was very pleased with the entire piece.
Although I started this project on a weekend, I let it dry thoroughly for a week before I primed it with a coat of gesso. The piece is primed and ready to be painted or even embellished with pieces of fabric, beads, small found objects or leftover jewelry pieces, but that will be the next project. I really enjoyed making this mask, and although I used old newspapers, you can always use magazines or any kind of scrap paper to make this project. You can use craft paint, a color wash or patina to paint your piece or any technique you’d prefer.

Forest Maiden Paper Mache Mask Before Primer

Forest Maiden Paper Mache Mask Primered with Gesso.