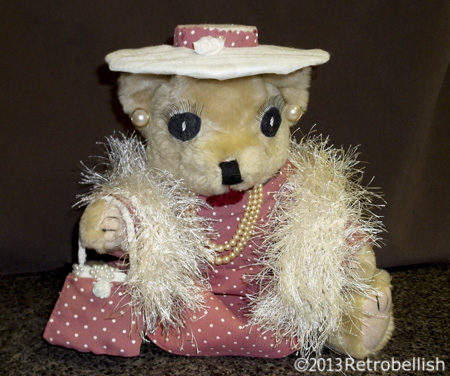
Reclaimed Teddy Bear
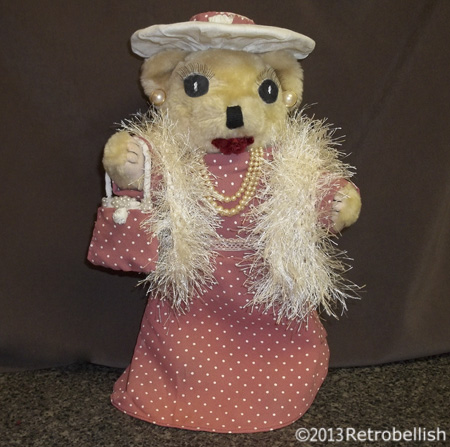
This recycled teddy bear project started from a beautiful but slightly damaged teddy bear that we bought at a craft store sidewalk sale in our neighborhood. The bear was a little dusty but nothing a little soap and water couldn’t remedy. The only thing wrong with this bear was that the eyes were ripped out and needed some kind of patches or replacement eyes. So I decided to start my next project with this bear because it had a nice color and the body joints were flexible. I was inspired to make a dress for the bear from an old deep pink polka-dot dress of mine that I had wanted to recycle for a future doll project. The bear was the perfect size and shape for this reclaimed fabric.
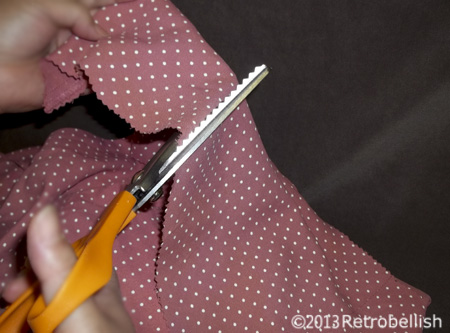
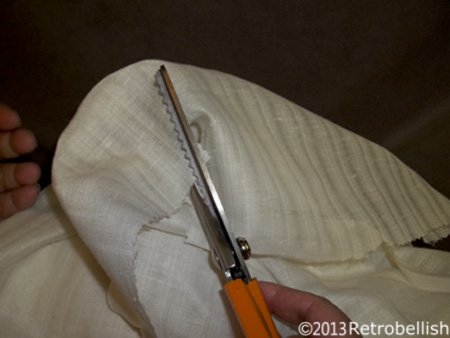
The bear washed nicely and after drying it thoroughly for several days, I laid the bear flat on craft paper that was larger than the bear. I took a pencil and traced an outline around the bear and marked the paper at the shoulders and legs (to determine the length of the dress). I then cut out the pattern, placed it against the different sections of the old dress to decide the best possible area to cut.
The old dress zipped on the center back and after placing the bear around different areas, I decided to try placing the actual bear inside the shoulder/sleeve section of the dress and found that the slight curve of the dress’s neck fit snugly around the curve of the bear’s neck and the dress’ floppy sleeve hung loosely around the bear’s wide belly like a skirt. There was plenty of fabric to fit all the way around the bear and more than enough dress fabric left over to make sleeves and a small purse. I designed a little purse and hat on paper.
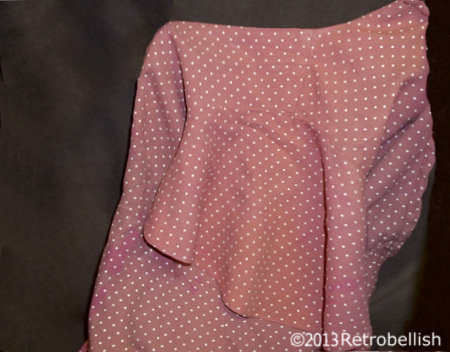
I carefully cut the bear’s dress from the shoulder/neck section of the dress, made a few minor alterations and hand sewed the fabric to complete the back of the bear’s dress. I then traced out sleeve patterns, cut them out on the dress fabric and sewed the little sleeves to the bear’s dress. I then put the dress back on the bear and it fit very nicely. From my box of beads, I found many pearl beads I had left over from another project. I sewed a few pearl beads onto each sleeve cuff.
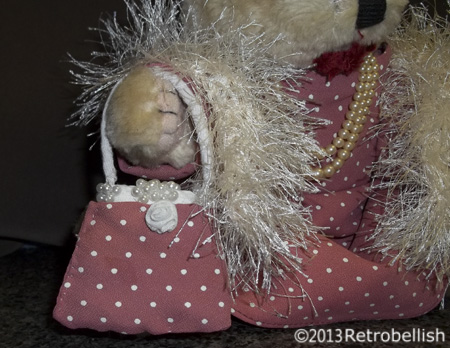
Next I traced the purse shape onto a thick piece of chip board and cut out more little cotton pieces from the cream colored blouse to cushion the little purse shape, then cut the dress fabric out for the little purse. For the purse strap, I cut a strip of cream colored cotton making sure to measure the strip length by wrapping it around the bear’s paw. I rolled up the strip and hand sewed the strap ends, one to each inside corner of the purse. I then covered the purse with the dress fabric and sewed the seam to one side of the purse. I placed a bit of cream colored fabric in the top center opening (and over the chip board insert) of the little purse and sewed more pearl beads onto the top and corner sections of the little purse.
Using matching tan colored thread, I sewed close each eye opening where the button eyes had been ripped out. In my remnant box of fabrics I used the same cream colored cotton blouse that I used to make purse parts. This particular blouse had a wide thick cotton band around the top and bottom edges. I cut out two circles on paper and held them up to the bear. After trial and error I found the perfect size eyes. I then traced the paper circles onto the blouse’s wide band and cut out two thick cotton circles. I sewed on the eyes and used a black dye fabric marker to color in the eyes. I then used white fabric paint to dot the center of each eye. The eyelashes I used were leftover from Halloween and I used fabric glue to affix them over each eye.
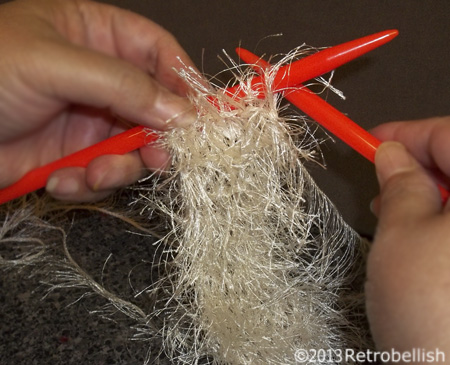
I found an old pearl necklace and pierced earrings, which I used to adorn the bear. I decided a cream colored shawl would look nice against the cream colored polka-dots, so I knitted a shawl using cream colored fun fur and size 11 knitting needles. I cast on 7 stitches and kept knitting until the shawl reached the length I liked on the bear. I also made the deep red lips on the bear by hand sewing a small length of deep red chenille yarn to the bear’s mouth area.

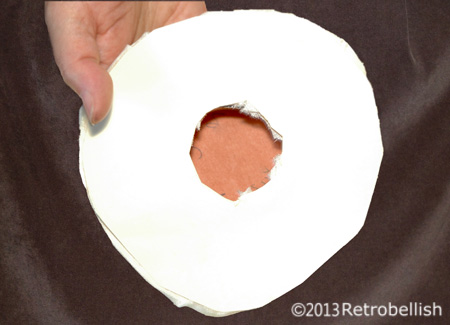
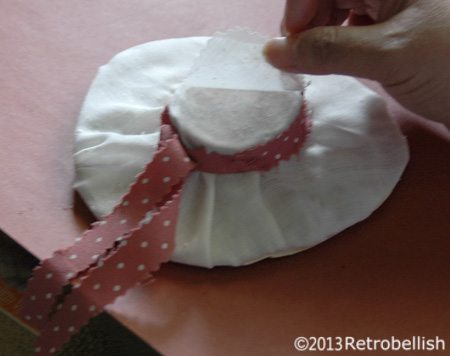
The hat was made from part of a recycled brown (thick cardboard) accordian pocket folder. Again, I measured and cut a big circle out from craft paper, put the cut paper circle on the bear’s head as this would measure the brim of the hat. I then made a couple of adjustments to the paper circle, traced it on cardboard and cut it out on the thicker cardboard. I cut the center of the circle in the center of the hat, rolled a smaller strip of the thick cardboard slightly inside the edge of the open hole (used glue along the edges), cut the a circle from the same chip board to complete the crown of the hat (also using glue to attach the circle to the crown). Next I used a remnant piece of cream colored fabric to cover the hat. I used a small strip of the polka-dot fabric to make a band around the rim of the hat.
Although I used this damaged bear to work on this project, you can always use one of your own bears or an old doll. Just remember to have fun creating your own piece of art.
Reclaimed Fabric Jester Doll
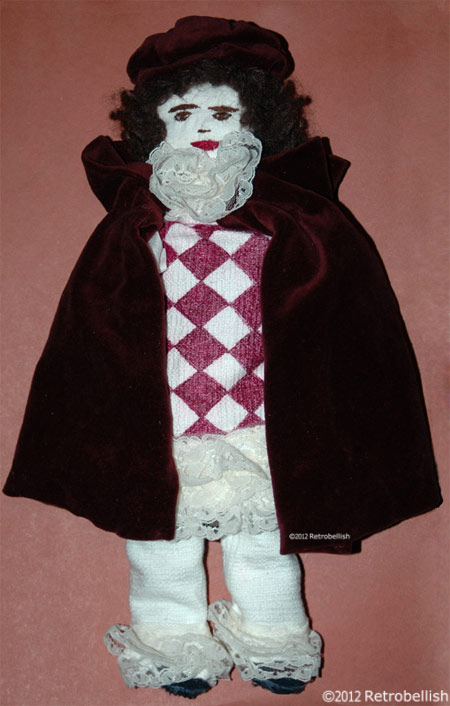
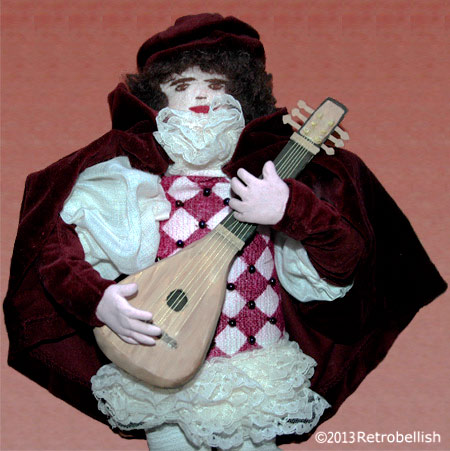
This little jester started out as an idea I had to make a medieval style doll about five years ago. I have always been inspired by the medieval style clothing from some of the great classic movies. The colors, the style and flow of the fabrics have always been a fascination of mine. A few weeks ago, while looking through my fabric remnants, I saw beautiful colors and lush textures that inspired me to make a jester doll.
Completed Jester Body
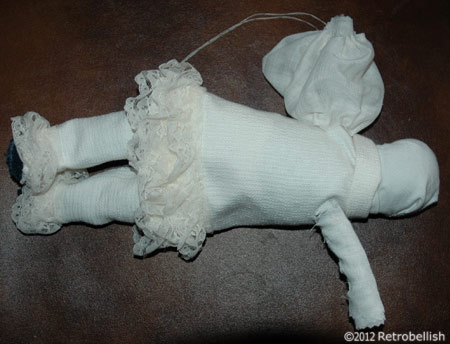
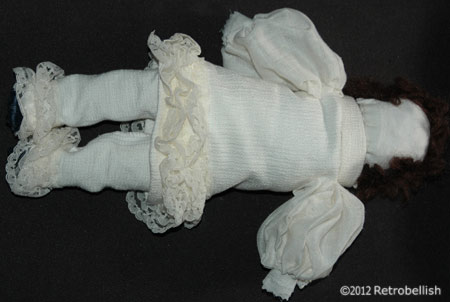
First, I had to create the doll’s body and since this would be an abstract cloth doll, I decided to use the fabric from an old cotton sweatshirt. I cut a lengthy portion from one sweatshirt sleeve and rolled up the cut piece forming a firm makeshift torso and sewed the edges to the rolled up portion. Next I cut smaller pieces from the same sweatshirt, rolled up the piece to make an arm in the same fashion as the torso and repeated these steps to make the other arm. I then sewed each arm piece to each side near the top of the torso. I followed the same procedures to make the legs and sewed them to the bottom portion of the torso.
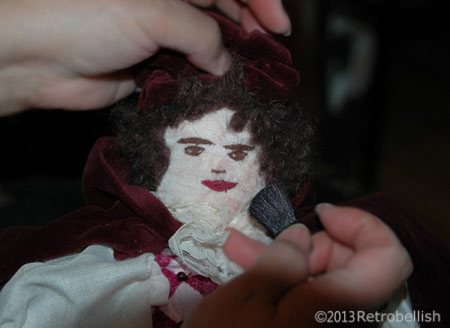
The head was challenging, but I used the same sweatshirt remnant from which I cut one lengthy piece. I rolled one long piece into a rounded ball shape and when big enough in proportion to the body, I pinned it in several spots and started sewing along all edges to secure the ball shape as much as possible. I cut apart old sheer knee high stockings and placed a piece over the round head shape, stuffed more cotton pieces at the base to make a neck and started sewing that part to the body. Next I looked through my remnant box and found a small piece of soft white cotton that was large enough to sew over the entire head. I took brown colored sewing thread to sew the jester’s eyes, eyebrows and nose. I used red sewing thread to make the lips. I then used brown curly wool trim to make the hair by sewing down the strips to the head.
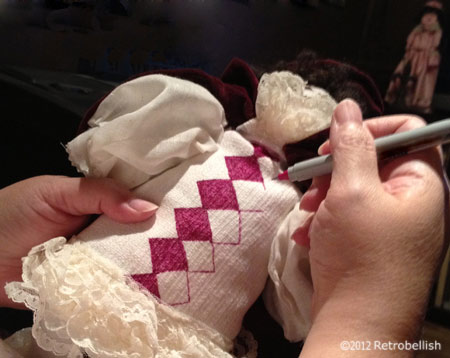
In my remnant fabric box, I found a beautiful cream colored cotton fabric, which was large enough to make the jester’s tunic, sleeves and pants. I spread the fabric out on a table and laid the doll flat over the folded fabric. By eye, I used a pencil to lightly trace around the doll creating a pattern on the fabric and (leaving a generous 1/2 inch seam allowance). I cut out the drawn pattern to sew the doll’s clothes. When I finally finished the jester’s clothes, I used a maroon colored permanent fabric marker to draw and color in a harlequin pattern onto the tunic. I had a roll of cream colored lace trim that perfectly matched the cream colored clothes. I used cream colored sheer cotton to separately make sleeves and connected them to the tunic at the shoulders and around the armholes.
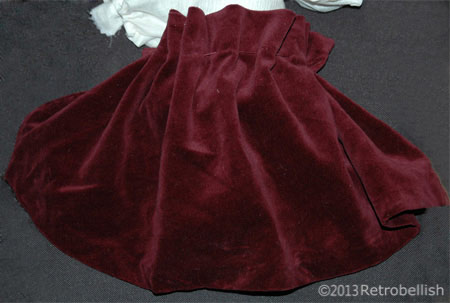
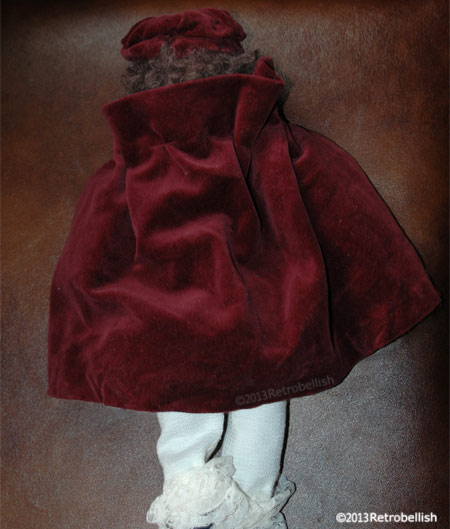
I also found a beautiful maroon colored velour fabric piece in my remnant box (cut from an old jacket of mine) and saw that it was perfect in size to make a cape for the doll. Using a matching maroon colored thread and needle, I basted long stitches about one inch from the cape’s top edge hemline. I sewed smaller single stitches down each side of the cape, placed it over the doll’s shoulders, and sewed a bottom hemline on the cape. Next, I decided to make a hat for the jester, so I took another maroon velour remnant and cut it into a trapezoid shape. I sewed together the longest edges forming a tubular shape (leaving the top and bottom ends open), and sewed the smaller opened side to the jester’s head (through the white fabric and hair), flattened down the rest of the tube while puffing out the fabric, which piled nicely forming a round puffy shape, sewed tiny stitches to hold the folds in place, and continued to form the hat as I went along. Then I sewed the center of the hat down through the center and hid those stitches under one of the folds of the last layer. I was very pleased with the results.

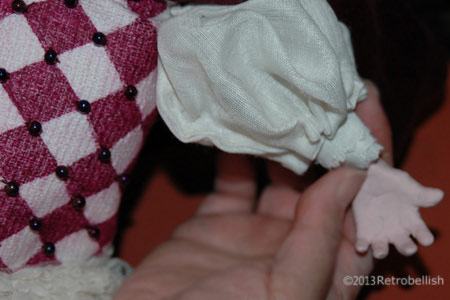
I adorned the harlequin pattern on the jester’s tunic by sewing on some maroon colored beads. I also made the jester’s boots from the same maroon velour fabric and sewed tight stitches to create the curled points on the boots.
Just like in some of the old movies I’d seen, I wanted the jester to be holding a mandolin. I looked up a picture of a mandolin on-line, drew it onto a piece of regular paper and figured out an appropriate size mandolin by holding it up against the jester. Once I figured out the correct size in proportion to the jester, I traced the mandolin pattern onto heavier paper and again onto corrugated cardboard. Next I measured where to make the center hole on the mandolin and used a paper punch to do so. Using acrylic craft paints, I painted the mandolin details onto the heavy paper pattern and let it dry.
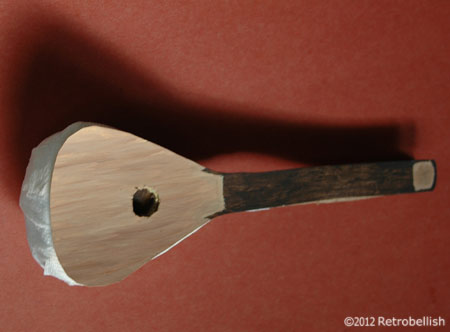

Next, I worked with the heavy corrugated cardboard mandolin and neck cutouts and glued them together. The lower back portion of the mandolin body was rounded (as if made from a hollowed out gourd). I achieved that look with paper mache (which I made from scrap paper towel strips watered down with white glue) and affixed that small round shape to the mandolin’s back by wrapping long narrow mache strips from the back and around to the front of the mandolin’s body. I then placed the mandolin on a piece of waxed paper and near the heating vent to dry. Once it dried overnight, I was able to remove the mandolin from the waxed paper without any problem. Next, I glued the painted mandolin paper veneer over the face of the heaver paper mache mandolin piece and painted the rest of the mandolin to match the already painted top veneer.
I cut small rectangular corrugated cardboard pieces to make the bridge and nut pieces on the mandolin, then used bright yellow sewing thread and fabric glue to adhere the strings onto the tiny rectangular bridge. Once the strings dried in place, I cut (with sharp scissors) the ends off of rounded toothpicks to make the tuning heads and pushed those cut pointy ends (dipped into a little glue) and into the head. Once they dried in place, I took one string at a time, dabbed glue around the tiny tuning heads and with tweezers, began wrapping each thread around its corresponding tuning head and cut off the excess. Once everything was dried, I placed the nut in place, and used glue to line up the strings evenly in place.
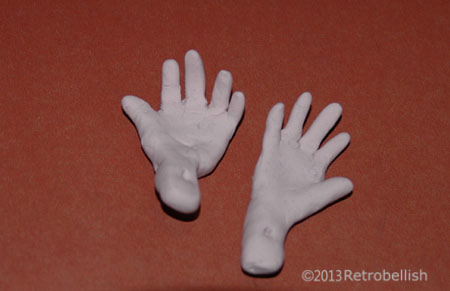
Last, but not least, I made the jester’s hands from flesh colored polymer clay. I rolled each finger and made some slightly longer or shorter matching the sizes for each hand. I made the palm part, a longer wrist part, pierced the end of the arm part with a toothpick (so that I could later sew the arm to the sweatshirt arm). I then attached the fingers onto the hand part and held them in front of me and while mimicking playing a guitar, curved the hands and shaped the fingers. I carefully placed the complete shaped pieces onto aluminum foil and baked them in the oven (carefully following the clay manufacturer’s instructions).
Although this project took me over a month to complete in my spare time, it can be done in several days with the right amount of time. And although I chose to make a jester doll, you could give it a try with any doll you’d like. So just have fun and create your own reclaimed fabric doll.
Make Your Own Earrings
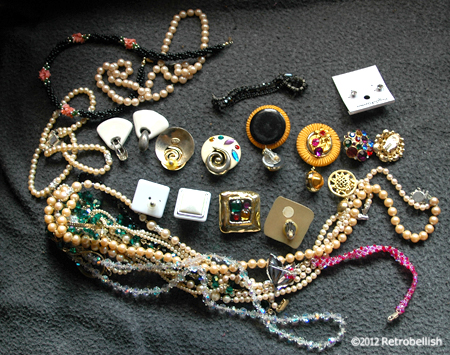
Earrings are one the easiest craft projects to make. I have always had a lot of fun making my own earnings, either from beads I already have on hand or from broken pieces I find at garage sales and thrift stores. Many years ago for my wedding, I wanted a simple pair of pearl earrings fashioned in a loop and preferably with very little sparkle, but could not find anything I really loved. After searching for so long, I decided to buy two different pair of earrings and use the pearls and pieces from the two to make my own.
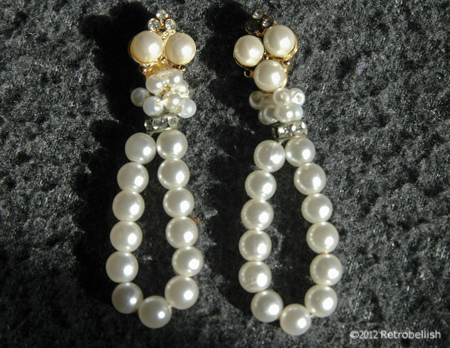
The neckline on my wedding dress was open with a scalloped edge that was decorated with small pearls and very few tiny sequins all the way around to my back. Because the neckline was so decorated, I was not going to wear any necklace and it was important that the earrings I wear have some length, but not be too bulky or sparkly. I wanted the long loops (which reminded me of the scalloped edge) to be made of small pearls matching (as close as possible) the size of the pearls on the scalloped edges of my dress. I really couldn’t find anything that even came close to what I imagined. Finally, I found what I was looking for in two pairs of earrings and knew I would to try and make my dream earrings. I was very satisfied with the results, and even received a few compliments.
Just because a necklace or bracelet is broken or outlived its luster, it doesn’t mean you can’t create your very own creation. So look at what you have on hand and let your imagination go wild, you will be surprised at what you can create. Have Fun!
Upcycled Polka-Dot Scarf

This simple project started out with an old black and white polka-dot pattern skirt that had outlived its used in my closet. I’m a big fan of anything polka-dot so I knew I just had to reuse this wonderful fabric in some of my future projects. I studied the skirt and realized that the fabric was still very silky, vibrant in color and had a great draping quality. These qualities made it the perfect fabric to make a beautiful scarf. The scarf style that I had in mind was a narrow and long scarf that would tie in a simple knot at the chest, or one that could be worn draped with a loose flipped-over knot at the chest.

I used one of my favorite scarfs that was similar in style. length and width as a template to see if I had the length and width needed for this project. I laid the old scarf over the longest length of the skirt to see if I had enough fabric to fashion the scarf. Once I determined that I had enough fabric on the skirt to cut out two long rectangles, I knew that sewing the two halves together at the half-mark would make one long beautiful scarf. I figured that the sewn seam at the half-mark would not be very noticeable because of the fabric’s pattern, and also because the scarf would be worn as a tie-style scarf which means the seam would always be (hidden) tucked under the collar of any blouse I’d wear.

I measured, then cut out two long wide rectangles from each edge of the skirt, folded the rectangles in half at the seams, ironed them smooth and sewed the open (opposite side) edges together. Then (wrong sides out) I sewed close one bottom edge and left the edge (at the neckline) open and then turned it inside out (gently pushing out the little corners with a knitting needle). This completed one long rectangle, thus making one-half of the scarf. Then I repeated these entire steps for the second-half of the scarf. I then joined both halves at the center and sewed the two halves together and ironed the whole scarf again. I was very happy with the results and was so glad to see that the fabric did drape beautifully.

And although I used an old polka-dot skirt from my closet for this project, you could use any fabric or style to make it your own. Another great project is to use fabric with a holiday theme print, they make a great personal gift for family and friends. So just have fun and make your own reclaimed fabric designer scarf.

Fabric Marker Embellishment

Sometimes simplicity is best, as with the case of this blouse I bought on sale last year. I really loved this blouse, especially the beautiful beading it already had around the neckline. The only thing I didn’t like was the plain white V patch on the front center of the blouse. I thought of sewing a piece of fabric over the patch from some of my beautiful remnants I had laying around from other craft projects, or even cutting the piece out completely, but the crafter in me decided to try my black fabric marker to create some kind of design.

I measured the white V patch on my blouse and traced several similar sized triangles on white paper. I drew many paisley designs on paper until I drew some designs I really loved, which turned out to be a flower, a leaf and some hearts. I then copied those designs onto the triangles until I liked their positions next to each other. I then used a permanent ink black fabric marker to draw them onto my little white V patch on my blouse. I took my time and figured that if I made a mistake, I could always go to plan B and sew a small beautiful fabric piece over the existing V patch. I was very happy with the results and even inspired to try it on one of my other plain white tee shirts (which I will definitely share on a future post).
