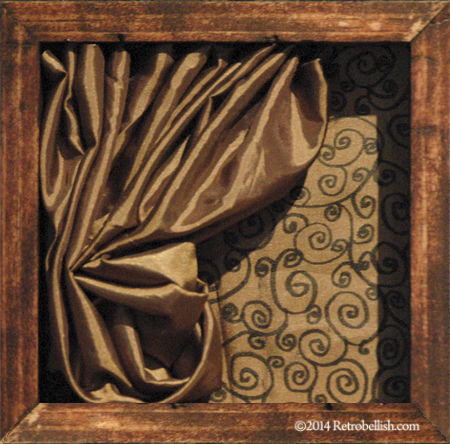
Reclaimed Wood Puppet Box
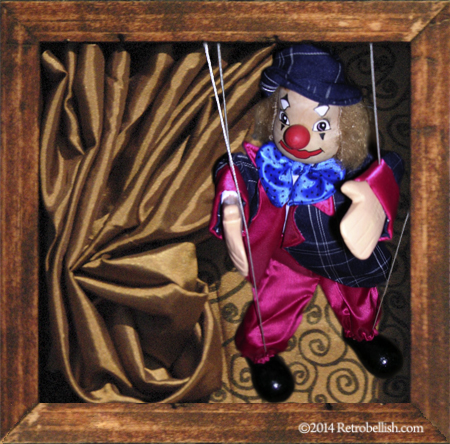
This Puppet Box Started out from a few reclaimed pieces of wood from a previous home repair. I cut the wood into four even pieces to make a square frame and then mitered the edges. I used a construction wood glue to bond the pieces together. After the wood glue dried, I applied a brown craft paint stain to the frame to give it a distressed look and feel. For the back of the wood puppet box, I measured and cut out a square from a sturdy (wheat cracker) box. I found a remnant fabric piece that was larger than the cardboard square and used fabric glue to affix the fabric edges onto the backside of the cardboard square. I then drew several swirl designs on paper to use as a guide. After the fabric glue dried, I used a fabric marker to draw a swirl design by eye onto the fabric square front side using my drawing as a guide. I used fabric glue and thumb tacks to adhere the fabric cardboard backing onto the back of the wood frame.
The little curtain was made from a larger remnant fabric piece. I measured and cut a narrow strip of sturdy cardboard from which I would suspend the little curtain. I used fabric glue along the edge of the narrow cardboard strip, gathered the fabric positioning it onto the narrow strip. Once the glued fabric draped like a little curtain, I used hot glue for a more permanent hold. Once the glue dried, I tacked the narrow strip to the top underside of the wood box. I then pulled the little curtain to one side and tacked it into the left side of the wood box. I then positioned the rest of the little curtain and carefully tucked then trimmed the bottom edge.
We had the little puppet lying around the basement for years and finally decided to give him a new purpose. The frame would make a good home for this puppet and in return we could display him on the basement wall instead of inside a storage box. The puppet’s strings are fastened to wood strips that allow you to maneuver the puppet. We posed the puppet inside the wood box and used thumb tacks to adhere the wood strips with strings into the top underside of the wood box. Although I used a stain for the frame, one can also use craft paint on the frame in your favorite color. Also the box can be used for any item such as small dolls, figurines, or even a photo.

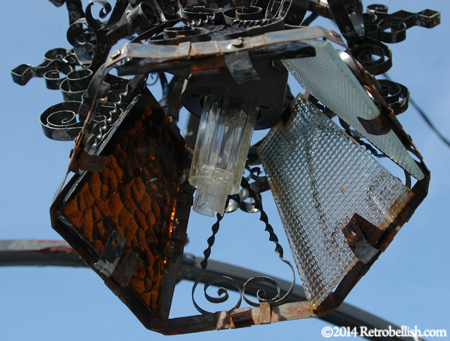
Trash Art Solar Lantern
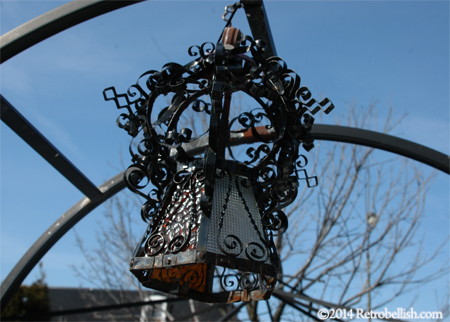
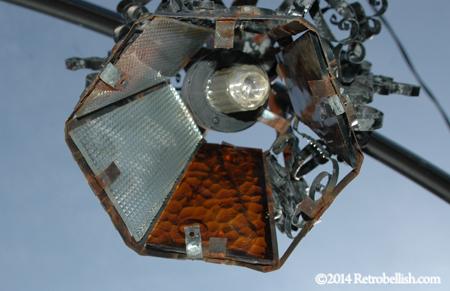
This trash art lantern was made from an old broken Spanish style lamp that we recycled. We did not do much to the lantern except clean it up and remove the wiring. We then used a found piece from a chain link fence to hang the lantern. We were able to bend some of the lamp’s metal pieces by hand to secure the fence piece.
This is one of those projects that are very simple and easy to make. We have enjoyed the lamp on our trellis in back yard for several years now.
For the light we used a found solar light piece (that still lit up) from a scrapped yard lamp. We simply inserted the solar light piece inside this lamp and again bent some of the lamp’s metal pieces by hand to hold the solar light piece in place.
Although we used this style lamp for this project, you can basically use any outdoor lamp and buy the solar light piece from any big box store for a few dollars to light up your very own recycled whimsical solar lamp art piece. So just have fun!
Spring Time Projects
Here we will be posting our new Spring 2014 projects.
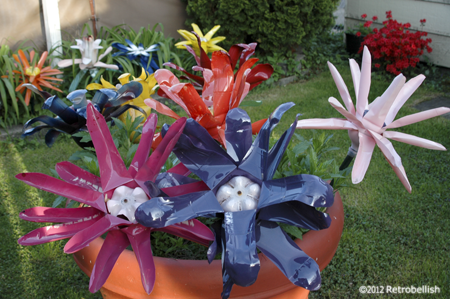
Plastic Soda Bottle Trash Art Flowers
This article “Plastic Bottle Trash Art Flowers” was previously Published April 22, 2012 By Diana Romaxx. Click Here For Article
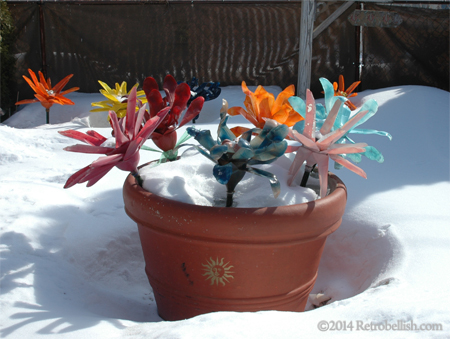
As we described in the previous article (in link above), we left our flowers outside throughout the entire 2012 winter and because they were very sturdy and held up so well, we left them out again throughout the 2013 summer and winter. We’ve had a very long, cold and snowy winter, yet these beautiful recycled plastic bottle flowers have again provided us with a beautiful colorful garden all winter long.

All the beautiful flowers retained their vibrant color, were beautiful to look at against the white snow all winter long. Not only is recycling great for our environment, but it is also a fun way to craft with family and friends. These were just some of the reasons that we decided to re-post this again, and also because of the warmth and cheerfulness these flowers provided us with over this long Chicago winter, which is not yet over.
Retrobellish Fashion Accessories
These are some of our previous reclaimed fabric projects about fashion accessories. Click on the pictures to read the whole articles. Reclaimed Fabric Red & Black Choker
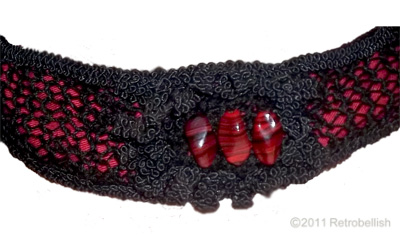
The choker was made from a leftover red fabric strip of soft thick cotton and a stretchy black netting that I knitted. I knitted the two pieces (using size 8 knitting needles and size 3 crochet thread–12 stitches wide by 36 rows). Next I hand sewed the edges of the finished knitted piece at the edges stretching it as I sewed it across the face of the red fabric to make the stitches wider and show off more of the red fabric. I then sewed on a trim all the way across on both edges.
Wearing Finished Beaded Fabric Cuff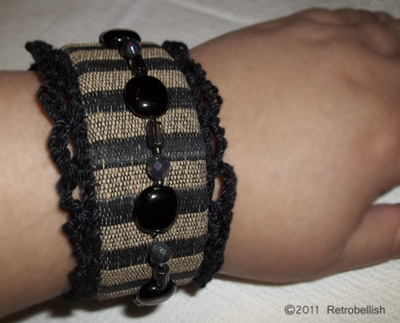
The finished cuff measured approximately 2 inches wide by 10 inches long. For fabric support, I used a 1/8 inch thick interfacing about a ¼ inch smaller than the fabric’s measurements. I wrapped the fabric around the interfacing and hand sewed the fabric with the seam in the back. I also sewed a small piece of solid black fabric over the seam in the back of the cuff to hide the seam and used a small black snap for the cuff’s closure.
Finished Denim, Lace and Pearl Pin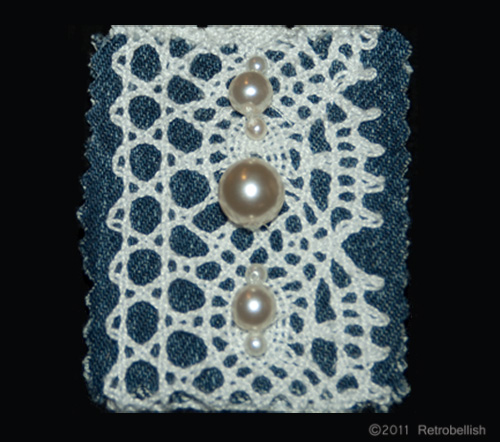
Recycling even the small scrap pieces of fabrics leftover from other projects could produce little fun pieces such as embellishments for other projects. I have a nice casual denim jacket that has an outside left breast pocket. The pocket is square in shape and I’ve always thought it would look nice with some kind of pin, but I didn’t like the look of any of the pins I have. I looked through my fabrics, trims and beads and combined a few things to see if I could make a pin for my jacket. I really liked the look of blue denim covered with a leftover piece of white lace trim. I looked through my beads and found some pretty white pearl beads of all different sizes. A few of the pearls looked nice over the white lace trim and both looked nice against the dark blue of the denim.