Repurposed Halloween Tote Bag
This gallery contains 15 photos.
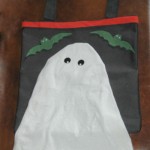
 Halloween is a great time of the year to reuse a lot of fabric remnants and other leftover craft materials to create fun ghoulish pieces. This project is made from an old tote bag I had laying around, an old white tee shirt, some leftover pieces of fabrics, cardboard, and a hot glue gun (or fabric glue).
I drew out an idea on paper and decided on embellishing the tote bag with some trim, a little ghost and two bats. I used an old white tee shirt to make the ghost, a round plastic lid to partially trace onto cardboard for the shape of a ghost head, an orange piece of trim, a small piece of black fabric (round sequins or buttons) for ghost eyes, a small piece of cardboard to make a bat template, and a small piece of green felt (or any green fabric) for the bats.
I decided what size the ghost head would be by holding a round lid against the tote bag. Once I found the size lid that served as a shape for the top of the ghost head, I used that lid to trace a half circle onto cardboard and cut out the cardboard shape. I only needed the half circle cutout for this project (or if you’d prefer, you can cut out a full circle and then cut it in half). This cardboard half circle will later be placed under the white tee shirt fabric to create the top of the ghost’s head.
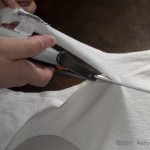
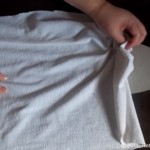
For the ghost, I used an old white tee-shirt and pinned down the half circle cardboard near the top center of the tee shirt and (freehand) cut the tee shirt (by eye) about a few inches from the cardboard following the shape of the head all the way around loosely shaping the ghost body freely down the left and right sides. You can leave the fabric bottom edge longer than the bottom edge of the tote bag, or trim it in any shape or design you’d prefer.
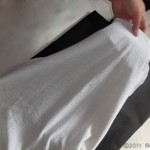
To create the ghost head shape, I tucked the half circle cardboard cutout under and near the top part of the fabric and tucked the fabric under the cardboard. I then used two big black sequins for the ghost eyes. I wanted to add more color to the bag so I found an old piece of bright orange fabric, cut a narrow strip to make a trim for the top edge of the tote bag.
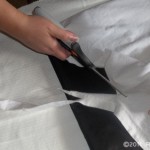
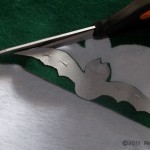
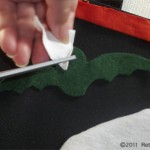
Next to make a bat template, I drew a bat shape onto cardboard, cut out the shape and placed it on the bag above the ghost to check the scale/size. I then pinned the cardboard bat onto the green felt and cut out the bat and repeated for the second bat. I snipped tiny pieces from scrap pieces of white tee shirt for the bat eyes (or you can use little beads, or fabric paint). Lastly, I placed all the cutout pieces where I wanted them, and used a hot glue gun to adhere all the pieces to the bag. I really enjoyed making this Halloween project.
-
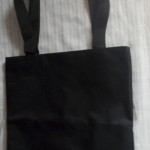
- Used Black Tote Bag
-
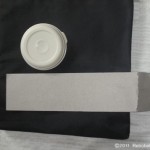
- Items Used to Create Ghost Template
-
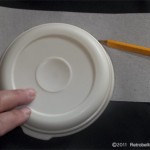
- Tracing Lid to Create Ghost Head Template
-
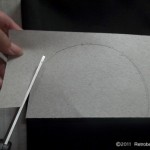
- Cutting Out Template for Ghost Head
-

- Finished Template Cutout
-
- Cutting Out Ghost Body
-
- Shaping Bottom of Ghost
-
- Covering the Ghost Head Template
-
- Forming Body of Ghost
-

- Positioning Sequin Eyes on Ghost
-

- Finished Ghost on the Tote Bag
-
- Cutting Out Bat Embellishment
-
- Cutting Out Eyes for Bats
-

- Bats on Tote Bag (Ready to Be Glued on Bag)
-
- Finished Halloween Tote Bag
Whimsical Wood Stools
These three wood stools were a great find at a clearance sale and a perfect fit for my kitchen counter. Although the stools were a little beat up, they were still very solid and I knew I could work with them. I knew I had some leftover upholstery fabric and foam pieces I had saved from a previous project that were just enough to cover the tops of all three stools. The stool tops were plain wood with white legs. Because my kitchen has a fruit theme and the fabric has a very colorful fruit theme, I wanted to give the stool legs a very colorful and lively look. So instead of painting the same designs on all three stools, I decided to just paint different whimsical designs on each of them. The designs I painted on the stools were red cherries against a light green background, purple grapes against a golden background, and a lively black-and-white checkered pattern. And although the stools are beginning to show some wear and tear, they look even more whimsical and rustic with age.
So if you have some old chairs around the house that just don’t match the decor of your home, with a little craft paint and a little time, you could recreate them into your very own work of art.

Three Painted Wood Stools
Scrap Wood Abstract Fish
This fish was made from leftover scraps of wood that we had saved from a book-shelf we had built a few years ago. The fish was drawn out on the wood freehand and then cut with a scroll-saw. The fish was sanded around the edges just enough to smooth it out. We then drilled a hole big enough to insert a small dowel-rod into the fish body and two holes were also drilled for the glass eyes at this time. The bottom fins were hand cut from fine cuts of the 2×4. To create the base, we used a piece of 2×4 and mitered the edge to give it a rounded cut around the top of it. We then aligned the fish with the base to find the balance point to drill a hole into the base to insert the bottom part of the dowel-rod from the fish body. Wood glue was used to glue the pieces together. The whole thing was then primed with gesso to assure even paint absorption. Then the fun part for me was painting and embellishing the fish.

Abstract Wood Fish Cutout

Abstract Wood Fish Primed

Abstract Wood Fish Left Side

Abstract Wood Fish Right Side
Retrobellish Beaded Fabric Cuff
Recently, I was looking through a fashion magazine and saw several jeweled cuffs that I really liked. Out of curiosity, I thought I’d try to make one of my own. It was a learning experience, because it took a longer time for me to choose the beads than the fabric. I had some interesting black and rustic gold striped fabric and then chose some beads that I thought would look nice against the fabric.
I lined up the beads and moved them around until I chose a pattern that I really liked. Then, instead of individually sewing each bead to the cuff, I decided that for flexibility I’d string about four beads and then tack them down (hand sewing a few stitches at the end through the cuff) before continuing with stringing the next four beads in the pattern I had chosen.
The finished cuff measured approximately 2 inches wide by 10 inches long. For fabric support, I used a 1/8 inch thick interfacing about a ¼ inch smaller than the fabric’s measurements. I wrapped the fabric around the interfacing and hand sewed the fabric with the seam in the back. I also sewed a small piece of solid black fabric over the seam in the back of the cuff to hide the seam and used a small black snap for the cuff’s closure.
Once I completed sewing the beads on the cuff, I felt that the cuff could use a little more embellishment around the edges, so I decided to crochet a small black trim. I used a size 3 crochet thread and size E/4 crochet needle. My simple pattern consisted of 60 chains in the first row. In the second row, I crocheted five chains and single crocheted into the third chain (of the first row). Then I repeated crocheting five chains and single crocheted through the third chain again, creating little loops. I repeated this crochet pattern for the other side of the cuff and then hand sewed both trims onto the cuff. I was really happy with the results.

Starting The Beaded Fabric Cuff

Sewing the Snap On Retrobellish Fabric Cuff

Making the Beaded Fabric Cuff

Crocheting the Trim for Beaded Fabric Cuff

Ready to Sew On the Finished Trims

Attaching the Trim to the Finished Cuff

The Finished Beaded Fabric Cuff

Wearing Finished Beaded Fabric Cuff
Recycled Gas Grill Planter
This tomato planter started out as a gas grill. It was going to be scrapped before David decided to give it a second chance by cleaning it thoroughly then painting the grill bright red. The side shelves were painted orange and he added some glass embellishments on the front. The grill is used to plant two different types of tomatoes and also doubles as a plant holder. The lid and tank from this grill were also recycled. This grill still has the original wheels so it can be moved around the yard easily.

Recycled Gas Grill Planter