Mayo Jar Windmill Trash Art
This whimsical mayo jar windmill is made from reused trash pieces. It consists of a plastic mayo jar, windmill from an old broken lawn ornament, a plastic cap from a one shot stain remover container (orange piece), an old broomstick painted blue, a tail from a lid of a 5 gallon pail of wall plaster. The yard ornament had one broken blade so David removed two more blades to even-out the windmill. He then painted the inside of the mayo jar white and left the cap blue.
After cutting out the appropriate size tail for the piece, the mayo jar cap was cut enough to insert the tail into the lid and then glued. The lid was then screwed back onto the mayo jar. For a stand, he used an old broomstick painted blue and capped it off with a cap from a small one shot stain remover container. The broomstick was then loosely screwed on from the inside of the mayo jar so it could rotate when the wind hits it. David makes his pieces to interact with nature as much as possible.

Mayo Jar Trash Art Right Side

Mayo Jar Trash Art Left Side
Knitted Doll Hat and Scarf
Although I have wrote about making these doll accessories in past articles, I also wanted to share them on Retrobellish. With the fall season upon us here in the Midwest, it’s time to take out the old sweaters and jackets again. It reminded me of when one of my nieces would always bring an old doll with her which she loved very much.
On one of my niece’s visits, she brought over her doll. The doll’s dress was white with a pretty pattern of light pink little blossoms. My niece looked through the trims that I kept in a tin and when she found some light pink lace trim, she asked if I could sew the pretty lace trim to the edge of her doll’s dress. In no time at all I hand sewed (using a simple straight stitch) the pretty pink lace to the bottom edge of her doll’s dress, as well as to the sleeves. My niece was so delighted and it only took a total of 15 minutes. Although most doll dresses are very beautiful, there may be some that over time (for a different look)could be enhanced by simply adding an embellishment or two.
The next time I went to visit them they were both so surprised because besides the cookies I brought, I brought another small box that I asked my cousin’s daughter to open as well. I was so pleased by the happy look on her face when she saw the hat and scarf I had knitted for her doll. It gave me great pleasure that she was so excited and it only took a couple of evenings to complete this project. So a way to use some leftover crochet thread (or yarn) is to make small embellishments for dolls or even doll clothes.
I used Fashion Crochet Thread (size 3, 100% Mercerized cotton), and number 2 size knitting needles. I cast on 7 stitches and knitted 60 rows. The fringe was made by cutting short strands (of the same crochet thread) and I used a size 00 crochet needle to pull the strands through the edge stitches and tied a knot around each of the strands (on both ends). I also knitted the hat in a similar manner, 7 stitches across, 17 rows in length, and whip-stitched both ends together. Using the same 00 crochet needle, I inserted thread through the edge stitches of one side to gather what would be the top of the hat and made a pom-pom for the top of the hat. I took the knot from the finished pom-pom and tied it through a loop in the center of the hat and made another knot to finish.

Knitting Small Doll Scarf

Knitted Doll Scarf and Hat Set

Doll with scarf and hat
Miniature Dollhouse Paintings
Small scrap pieces of canvas can make small pieces of art to warm one’s heart! One of the crafts I love to make are dollhouse miniature paintings in the 1:12 scale. They are very therapeutic to paint and are highly collectible. These paintings are painted on scrap pieces of canvas, museum board, and sometimes on small pieces of wood. I used to go to an art shop not far from home that also did custom framing, and they would put together bags of scrap pieces for crafters and artists to buy for small paintings — a great way to reuse the store’s scraps. Materials used for these paintings were museum board scraps and acrylic paints.

Miniature Dollhouse Paintings On Scrap Pieces of Museum Board
Denim, Lace and Pearl Pin
This gallery contains 10 photos.
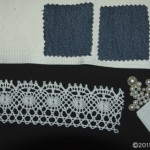
Recycling even the small scrap pieces of fabrics leftover from other projects could produce little fun pieces such as embellishments for other projects. I have a nice casual denim jacket that has an outside left breast pocket. The pocket is square in shape and I’ve always thought it would look nice with some kind of pin, but I didn’t like the look of any of the pins I have. I looked through my fabrics, trims and beads and combined a few things to see if I could make a pin for my jacket. I really liked the look of blue denim covered with a leftover piece of white lace trim. I looked through my beads and found some pretty white pearl beads of all different sizes. A few of the pearls looked nice over the white lace trim and both looked nice against the dark blue of the denim.
I came up with an idea to make a rectangular shaped pin for my denim jacket pocket. So I took my pinking shears and cut about 3 inches of blue denim (and then cut a second piece for the back of the pin), about 5 inches of the white lace, and made sure to cut the denim wider than the lace (the denim measured 2-1/2 inches wide). The pin needed some support so I have some 1/8th inch thick interface that I cut to a smaller size than the length and width of the denim pieces.
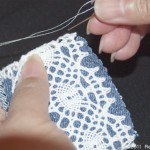
Although I used pinking shears to cut the lace, to make sure the lace edges would not unravel, I used a few drops of Fray Check over the cut lace edges. Fray Check is a liquid solution which keeps fabric edges from unraveling.
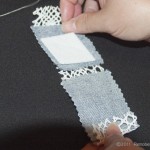
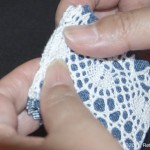
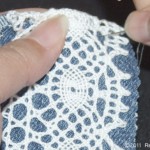
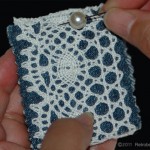
I wrapped the lace around the denim pieces, firmly held together all the pieces and then hand sewed the white lace to the denim. At some points I made sure that I also sewed through the interface piece (sandwiched in the center). I played around with the layout of the pearl beads, chose a simple pattern I really liked, and sewed on the pearls. I’m really happy with the look of my new pin and have used it on my jacket pocket.
-
- Materials Used for Pin
-
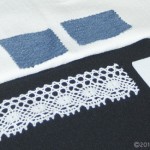
- Ready to Begin
-
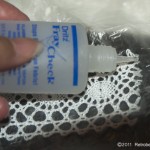
- Applying the Fray Check to Lace Edge
-
- Positioning the Interface on the Denim
-

- Sandwiching the Interface
-
- Begining to Sew Lace and Denim
-
- Aligning All Materials
-
- Sewing through All Materials
-
- Positioning the First Pearl
-
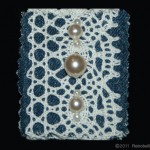
- Finished Denim, Lace and Pearl Pin
Folk Art Cat Painting On Recycled Paneling
We had some paneling pieces that we removed from one of our rooms some years back. We were able to give the big panels to a friend who was able to reuse them, but we had some odd pieces left that we wanted to use for crafting. We were able to cut the leftover pieces into perfect sizes so I could paint on them instead of canvas. I then gave them a primer coat of gesso. I started painting on them just for fun, but ended up selling some of my Cat pieces. The folk art cat painting featured here was one of the paintings that I painted on the recycled paneling in 2005 using acrylic paints

Folk Art Cat Painting On Recycled Paneling

Folk Art Cat Painting Backside