Repurposed Floral Vase

This glass vase started out as a gift from a close friend of ours. She gave us a set of two, but we were on the verge of a home remodeling project and decided not to open the vase boxes for fear of breaking them. When we finally decided to use the vases, we discovered one vase had a cracked rim, and by then too much time had gone by to exchange it.
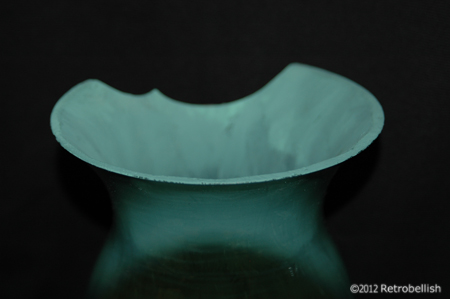
So I decided to re-purpose the damaged vase as a painted glass vase. I started out by taking a trip to my local home improvement store to get all the items I needed for the project. Since the crack was only about a few inches long (in the shape of a half moon), I decided to just get some fine grade sandpaper to smooth off the broken glass edges. Also, I was able to purchase a small can of forest green acrylic enamel on clearance. I sanded the cracked rim until the sharpness was gone (wear gloves when doing this part) and the glass was smooth. I then painted the inside of the glass vase with the deep forest green paint I had purchased. I then let it dry for about a day. After the vase was completely dry, it looked like green glass and the crack was not as visible any more–perfect for some dry or silk flower arrangement.
I decided to use some tall silk peonies I had purchased a few months back on one of my weekend trips to a small neighborhood craft store. The craft store mostly has a lot of bridal accessories, but always has great clearance sales on their floral supplies. The flowers I had were big and bulky, perfect for the size of the vase. The other green leafed pieces I had were leftovers from other projects. When I started to play around with the flowers and the greenery, it started to create a very lifelike arrangement that I decided to keep.

This vase could also have been painted in any color of your choice, even Mod Podged with old magazine cutouts or any art of your choice. This project could also be done on any glass vase to which you may want to give a new look. The beauty is that if you don’t like the color, it could be changed. So just have fun and create your very own one-of-a-kind piece.
Grapevine Holiday Wreath

The holiday season is a fun time of the year to get creative with decorations for your home. This grapevine holiday wreath is very simple to make and could easily be updated every year with different ornaments of your choice. I had a very plain grapevine wreath at home that I wanted to decorate with some type of ornaments, but nothing too big that would hide the beauty of the vines.
Right after the holidays last year, I went to a craft store clearance sale and found some beautiful ornamental sprigs that I really loved. One of these sprigs was perfect because it had beautiful deep red berries and gold leaves that looked beautiful when I held them up against the wreath. I loved the look so much that I wired the sprig onto the wreath and decided that a bow at the top would balance out the wreath. I found a beautiful deep red bow with gold edging that complimented the sprig perfectly.

It felt wonderful to hang such a beautiful wreath on the door. These grapevine wreaths are very strong and versatile and lend themselves to many different types of decorating techniques. So just have fun and create your very own one-of-a-kind wreath.
Upcycled Mens Suit

The inspiration for this project came to me while cleaning out David’s closet this fall. We were taking down the summer clothes for the winter when I came across a few of David’s old suit jackets from his younger days which he had outgrown many moons ago. We decided to donate most all the clothes in the closet to the Salvation Army except a few pieces I decided to keep to upcycle. One was this navy-blue suit jacket and the other was an old pair of jeans. I have always loved to embellish the lapels of my jackets and I had an idea to use the jeans to make a hand painted applique for this suit.

I started out by trying on the jacket, pinning it to a length I liked and cut the suit 14 inches from the bottom edge using pinking shears to prevent the fabric from fraying. To create a smooth bottom edge, I measured a 1/4 inch hem, sewed it, and then used a cool iron. I then used a pencil and plain paper (taping a second piece of paper) to trace each lapel and part of the neckline area. I then carefully cut out a pattern for each side. I took the paper patterns and pinned them onto the denim. Using tailor’s chalk, I added a 1/4″ inch hem all the way around, then cut out the denim shapes. I sewed the denim pieces onto the jacket and carefully sewed on the neckline pieces as well. I also used extra denim pieces and leftover buttons from this jacket project to embellish the pocket. For further embellishment, I used a dark navy-blue permanent fabric marker to draw vines and leaf shapes onto the lapels and neckline.

When I had tried on the jacket, I knew the sleeves had to be shortened, so I left these for last. I measured the length that I liked, pinned the sleeves a bit longer for a hem, removed the buttons from each sleeve cuff, and cut the sleeves with my pinking shears. I sewed the hem, ironed and sewed on the buttons. I used what I had available to me at the time, but this project could also be accomplished with an old coat, a woman’s suit jacket or blazer. Thank you for stopping by! Just have fun and create your own.
Upcycled Blue and White Floral Jacket

This project started out with two thrift store finds. One was a beautiful blue and white floral cotton dress with a great looking lace edged collar. The other was a plain white cotton jacket. The idea I had was to take the collar from the dress (since it was a size that didn’t fit me), and add it to the jacket. The beautiful floral pattern dress had a lot of potential and lent itself to many other projects because of the extra full fabric bottom.
I started out by carefully cutting out the collar from the dress and leaving about an inch of extra fabric all the way around the collar edge. This would help me position the collar more evenly with the jacket collar and have extra fabric on which to sew it more securely to the jacket. I then started pinning the dress collar to the jacket neckline area and decided to cut away some of the jacket collar to remove bulk. Once the collar was evenly positioned I started pinning it to the jacket so I could begin to sew the two together. This worked out well and looked very nice when completed.

Next, I measured the length of the full skirt-part of the dress (from the waist to the bottom edge) and then measured the jacket from under the left front collar center opening (down the center) to the bottom edge. I then repeated the same process on the right side center jacket opening. I thought that a two inch wide strip of floral fabric would look good adorning each open edge of the jacket. I cut a six inch strip from the dress doing my best (by eye) to pick the same floral pattern on the dress for each side of the jacket. I folded each floral strip (by eye) to a width that looked nicely balanced when placed on the jacket edge, and then I pinned it down. Then I measured the strip and ironed it, which made it so much easier to make the second matching strip for the other jacket edge. I loved how the blue and white floral fabric strips looked on the jacket. It turned out rather well and can be worn with a pair of white shorts, pants, light blue shorts or even jeans.

Because I have so much of the blue and white floral fabric left over, I think I will try making a camisole to wear with the jacket. I might even take one of my white camisoles and make a floral strip to add to the top edge of the camisole (definitely a future post). One could also take fabric strips and glue them to a belt to make an accent piece with a jacket. In the past, I’ve even used fabrics I liked on old shoes. So have fun and don’t hesitate to take two of your old pieces and by combining them, see how you can recreate a new piece of your very own. Nothing perfect here, no exact science, just have fun and be yourself.
Reclaimed Silk Flower Topiary

This reclaimed silk flower topiary started out as an idea I had after making some miniature topiary center pieces for a bridal shower. For the miniature topiary base I used some shot glasses that I purchased at a local thrift store. As I looked through my craft box, I found I had all the materials needed to make a big topiary from leftover craft materials I had collected over the years. I found a large shabby Styrofoam ball, a dowel rod, a variety of silk flowers and leaves left over from my many previous floral craft projects. I had an old planter in the basement that I cleaned up and decided to use for the base.
I first painted the dowel rod with a brown craft acrylic paint so that it would resemble a tree branch. Once the painted dried, I inserted the brown dowel rod into the center of the Styrofoam ball. The Styrofoam ball was kind of beat up, but it didn’t matter because it was going to be covered with the flowers and leaves.
I had many large yellow sunflowers, purple little blossoms, and many leaves in various shapes, sizes and shades of green, so I decided these were the materials I would use to make the topiary. I then separated all of the leaf varieties and chose the ones I would use to cover the background surface of the Styrofoam ball. I started by cutting the flower stems and leafy branches to a uniform length, leaving the stems long enough to insert into the Styrofoam ball. On a table, I laid out the flowers and leaves to get an idea of how to evenly distribute them over the surface of the Styrofoam ball. I then started inserting the flowers and leaves in a small area, and continued until I found a very nice pattern, which I continued until I covered the entire surface of the Styrofoam ball.

Once I finished covering the surface with the flowers and leaves, the topiary looked very nice and full, but then the dowel rod looked kind of thin in comparison to the volume of the topiary, so I went to my backyard and found a couple of small tree branches that I thought might look good tied to the dowel rod for extra dimension. It worked, because after using some gold ribbon to tie the branches to the dowel rod, the branches definitely added more bulk, but also made the dowel rod look like a branch as well.
For weight, I mixed some Plaster of Paris and poured it into the planter and held the dowel rod in the center until the plaster dried enough to let go. I let the plaster dry for a few hours before touching up the flowers. I added a few remnant leaves and flowers at the base of the topiary to hide the smoothness and white color of the plaster base. And although I used Plaster of Paris, other items such as rocks, dirt, cement and reused Styrofoam can also be used to weigh down the topiary. So have fun looking through your craft supplies and maybe you’ll be surprised to find that you have a lot of fun materials to make your own topiary in any size, shape and color.