Reclaimed Rebar Chair
This rebar chair was an alley find that my husband came home with. I immediately loved the style of the chair and thought we could refurbish it. The chair was a little dirty, a bit rusty and had one of its legs disconnected from the top rim. With a thorough cleaning, a few repairs and a little paint, I knew it was possible to save this chair.
To make a new seat cushion, I used the bottom of the chair as a template and traced the circle onto thick plywood that I asked my husband to cut out. I had some old upholstery foam I had saved from a previous project, and used a small pillow I had that was the perfect size for the top part of the chair. The beautiful light teal fabric I used for this chair was from an old curtain I had purchased at a thrift store for another project I had in mind. A friend of ours welded the leg back on for us. We were very pleased with the results of our labor and we still use the chair to this day, after 17 years.

Rebar Chair

Rebar Chair Rear View

Closeup of The Rebar Chair Details
Reclaimed Fabric Red & Black Choker
The choker was made from a leftover red fabric strip of soft thick cotton and a stretchy black netting that I knitted. I knitted the two pieces (using size 8 knitting needles and size 3 crochet thread–12 stitches wide by 36 rows). Next I hand sewed the edges of the finished knitted piece at the edges stretching it as I sewed it across the face of the red fabric to make the stitches wider and show off more of the red fabric. I then sewed on a trim all the way across on both edges.
Separately, I sewed the same trim in little loops around the center so it looked like a flower. I then sewed three little red and black ceramic beads in the center of the flower. I then crocheted (using size E/4 crochet needle) two little squares as closures (using size 3 red crochet thread) and sewed a black button to one end and a little crocheted loop on the other end. I then sewed each red crocheted piece at each end of the choker.
Recently, I had made a black and gold striped cuff in a previous article and thought it would be a great idea to make a choker with other leftover fabric pieces and embellishments I already had.

Sewing The Black Trim On the Finished Choker.


Reclaimed Fabric Red & Black Choker
Art On Reclaimed Plaster Lion
This lion cub is a plaster piece that had been painted in a dark color that made the lion cub dull and bland. We had acquired some statuary from a plaster business that was closing in Milwaukee, Wisconsin about 13 years ago. I had painted an abstract painting at the time that I named Confetti and my husband suggested that I should paint the same colors and designs on the lion cub as an abstract piece. At first I thought it would be better if I painted the cub in realist coloring and features, but later decided my husband was right and I should give it a try.
It was very interesting to paint the cub in the same abstract colors and designs I had used in my painting. I had so much fun and was very impressed with the results that I decided to name him Calico Cat. Here I have featured the original painting and Calico Cat. I’m glad I listened to my husband’s advice — sometimes it’s fun to use your imagination on an old piece and give it a new look and feel.


Confetti Painting by Diana Romaxx
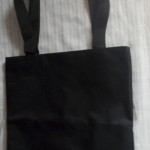
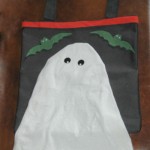
Repurposed Halloween Tote Bag
This gallery contains 15 photos.
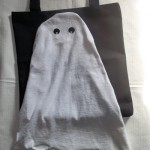
 Halloween is a great time of the year to reuse a lot of fabric remnants and other leftover craft materials to create fun ghoulish pieces. This project is made from an old tote bag I had laying around, an old white tee shirt, some leftover pieces of fabrics, cardboard, and a hot glue gun (or fabric glue).
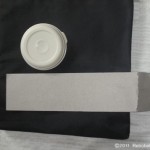
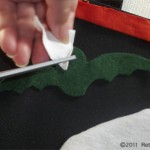
I drew out an idea on paper and decided on embellishing the tote bag with some trim, a little ghost and two bats. I used an old white tee shirt to make the ghost, a round plastic lid to partially trace onto cardboard for the shape of a ghost head, an orange piece of trim, a small piece of black fabric (round sequins or buttons) for ghost eyes, a small piece of cardboard to make a bat template, and a small piece of green felt (or any green fabric) for the bats.
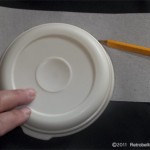
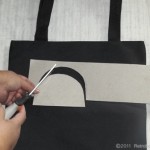
I decided what size the ghost head would be by holding a round lid against the tote bag. Once I found the size lid that served as a shape for the top of the ghost head, I used that lid to trace a half circle onto cardboard and cut out the cardboard shape. I only needed the half circle cutout for this project (or if you’d prefer, you can cut out a full circle and then cut it in half). This cardboard half circle will later be placed under the white tee shirt fabric to create the top of the ghost’s head.
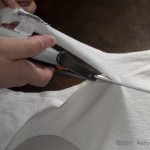
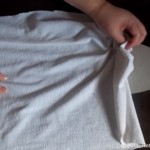
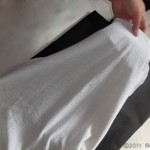
For the ghost, I used an old white tee-shirt and pinned down the half circle cardboard near the top center of the tee shirt and (freehand) cut the tee shirt (by eye) about a few inches from the cardboard following the shape of the head all the way around loosely shaping the ghost body freely down the left and right sides. You can leave the fabric bottom edge longer than the bottom edge of the tote bag, or trim it in any shape or design you’d prefer.
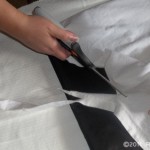
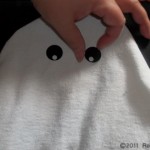
To create the ghost head shape, I tucked the half circle cardboard cutout under and near the top part of the fabric and tucked the fabric under the cardboard. I then used two big black sequins for the ghost eyes. I wanted to add more color to the bag so I found an old piece of bright orange fabric, cut a narrow strip to make a trim for the top edge of the tote bag.
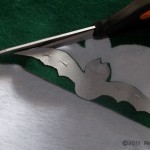
Next to make a bat template, I drew a bat shape onto cardboard, cut out the shape and placed it on the bag above the ghost to check the scale/size. I then pinned the cardboard bat onto the green felt and cut out the bat and repeated for the second bat. I snipped tiny pieces from scrap pieces of white tee shirt for the bat eyes (or you can use little beads, or fabric paint). Lastly, I placed all the cutout pieces where I wanted them, and used a hot glue gun to adhere all the pieces to the bag. I really enjoyed making this Halloween project.
-
- Used Black Tote Bag
-
- Items Used to Create Ghost Template
-
- Tracing Lid to Create Ghost Head Template
-
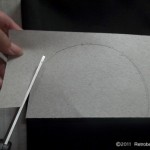
- Cutting Out Template for Ghost Head
-
- Finished Template Cutout
-
- Cutting Out Ghost Body
-
- Shaping Bottom of Ghost
-
- Covering the Ghost Head Template
-
- Forming Body of Ghost
-
- Positioning Sequin Eyes on Ghost
-
- Finished Ghost on the Tote Bag
-
- Cutting Out Bat Embellishment
-
- Cutting Out Eyes for Bats
-

- Bats on Tote Bag (Ready to Be Glued on Bag)
-
- Finished Halloween Tote Bag
Whimsical Wood Stools
These three wood stools were a great find at a clearance sale and a perfect fit for my kitchen counter. Although the stools were a little beat up, they were still very solid and I knew I could work with them. I knew I had some leftover upholstery fabric and foam pieces I had saved from a previous project that were just enough to cover the tops of all three stools. The stool tops were plain wood with white legs. Because my kitchen has a fruit theme and the fabric has a very colorful fruit theme, I wanted to give the stool legs a very colorful and lively look. So instead of painting the same designs on all three stools, I decided to just paint different whimsical designs on each of them. The designs I painted on the stools were red cherries against a light green background, purple grapes against a golden background, and a lively black-and-white checkered pattern. And although the stools are beginning to show some wear and tear, they look even more whimsical and rustic with age.
So if you have some old chairs around the house that just don’t match the decor of your home, with a little craft paint and a little time, you could recreate them into your very own work of art.

Three Painted Wood Stools